Frog API 文档中心
Frog API Guide
统一接入文档 · 教程整理版 Unified integration docs · extracted knowledge base
快捷入口
Quick Links
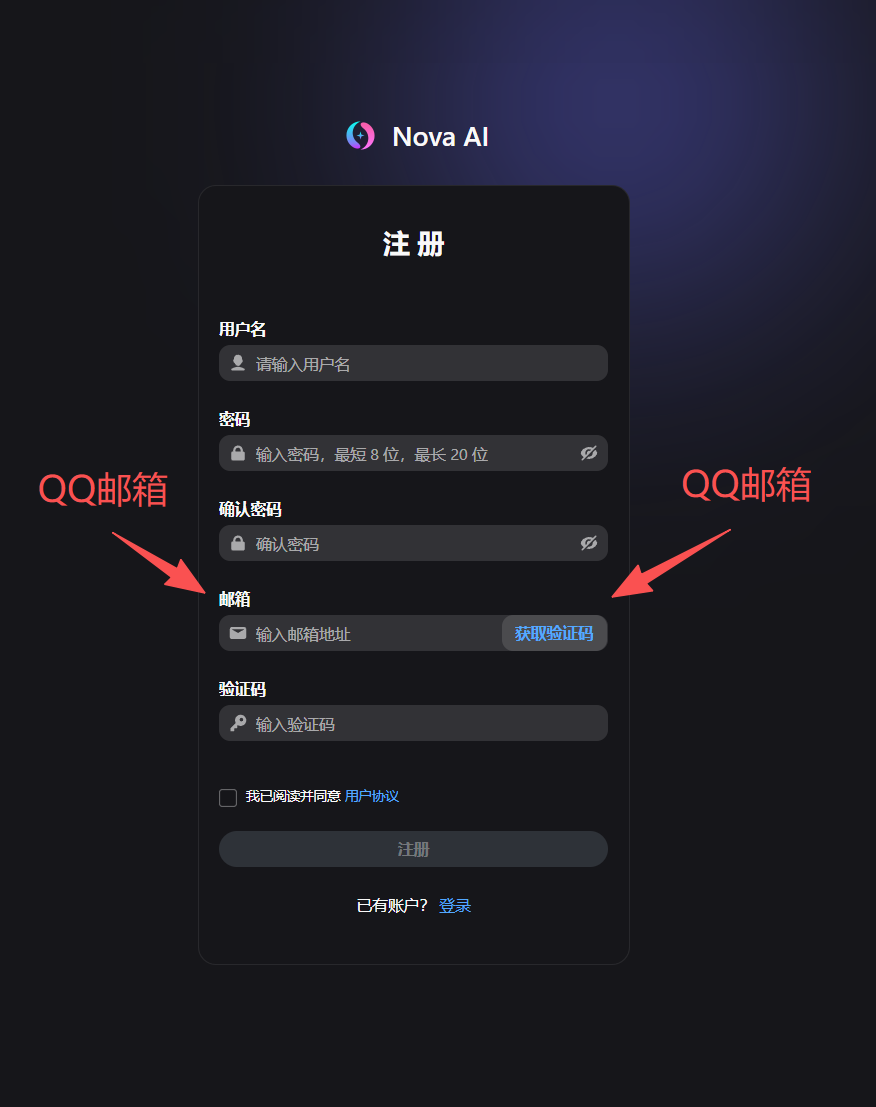
注册账号 Registration 👉 前往主站 👉 Go to Main Site
接口示例
API Examples
添加自定义 Provider(关键步骤)
Add Custom Provider (Key Step)
在配置文件中,将以下 JSON 代码片段加入到 models.providers 块中:
Add the following JSON to models.providers block:
"models": {
  "providers": {
    "claude": {
      "baseUrl": "https://www.frog-api.com",
      "apiKey": "sk-xxxxxx你的网站获取的秘钥",
      "api": "anthropic-messages",
      "models": [
        {
          "id": "claude-opus-4-6",
          "name": "claude-opus-4-6",
          "reasoning": false,
          "input": ["text"],
          "cost": {
            "input": 0,
            "output": 0,
            "cacheRead": 0,
            "cacheWrite": 0
          },
          "contextWindow": 200000,
          "maxTokens": 8192
        }
      ]
    }
  }
}
cURL 示例
cURL Example
curl https://www.frog-api.com/v1/chat/completions \
  -H "Content-Type: application/json" \
  -H "Authorization: Bearer sk-xxxxxxxx" \
  -d '{
    "model": "[次]gemini-3-pro-preview",
    "messages": [{"role": "user", "content": "Hi!"}]
  }'
Python 示例
Python Example
from openai import OpenAI

client = OpenAI(
    api_key="sk-xxxxxxxx",
    base_url="https://www.frog-api.com/v1"
)

response = client.chat.completions.create(
    model="[次]gemini-3-pro-preview",
    messages=[{"role": "user", "content": "Hi!"}]
)
获取 API 令牌
Get API Token
🎬 令牌配置教程
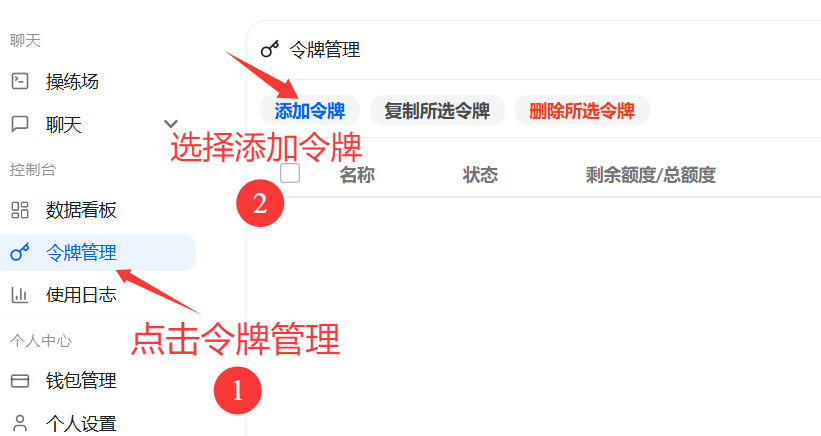
点击令牌管理
Click Token Management
显示操作项,选择添加令牌 Show options, select Add Token
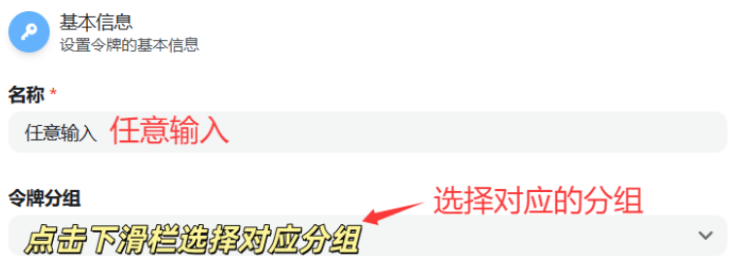
输入名称并选择分组
Enter Name and Select Group
名称任意输入,点击下滑栏按需求选择令牌分组 Enter any name, select Token Group from dropdown
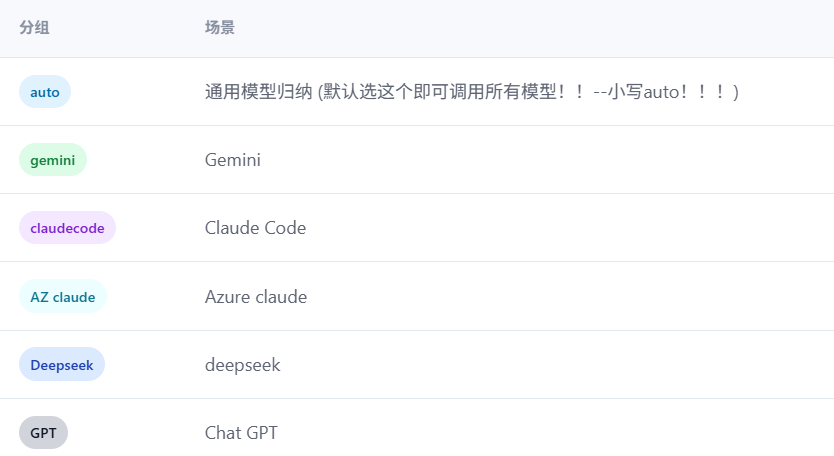
默认选auto分组即可!!! Just select "auto" group by default!!!
设置过期时间和数量
Set Expiration and Quantity
过期时间选择永不过期,新建数量选择一个 Set expiration to Never, quantity to 1

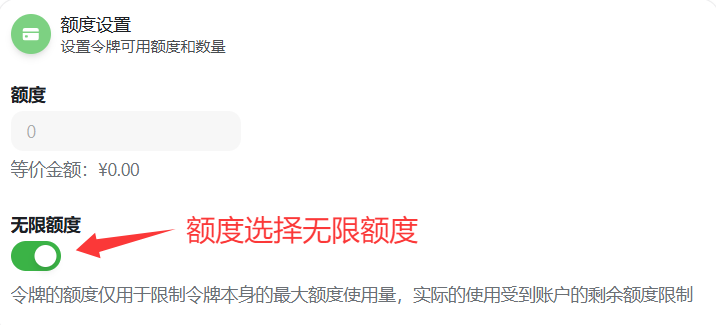
设置令牌额度
Set Token Quota
令牌额度选择无限额度 Select Unlimited Quota
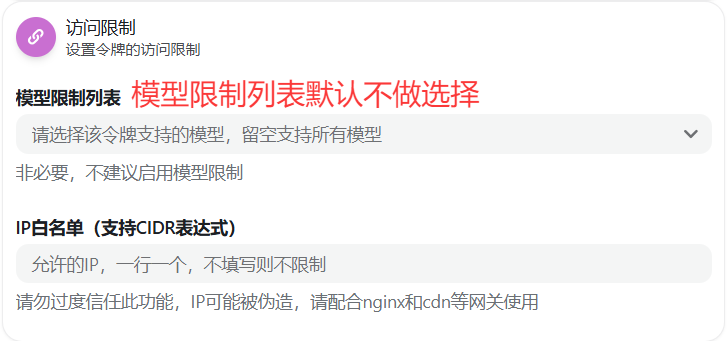
模型限制(可选)
Model Restrictions (Optional)
模型限制列表默认不做选择 Leave model restrictions empty by default
复制密钥
Copy Key
生成的密钥选择小眼睛旁边的点击复制即可 Click Copy button next to the generated key

Claude Code 配置指南
Claude Code Setup
GitHub farion1231/cc-switch v3.11.1(单击跳转!)安装步骤
Installation Steps
1. 安装 Node.js
1. Install Node.js
访问 Node.js 官网,建议下载左侧的 LTS 版本,它是长期支持版,更加稳定。 Visit Node.js official website, download the LTS version on the left for better stability.
2. 安装 Git
2. Install Git
访问 Git 官网,页面会自动推荐适合你操作系统的版本,点击按钮即可下载。 Visit Git official website, the page will automatically recommend the version for your OS.
3. 安装 Claude Code
3. Install Claude Code
打开 cmd 命令行,通过 npm 安装 claude-code: Open cmd and install claude-code via npm:
npm install -g claude-code🎬 Claude Code 配置教程
配置步骤
Configuration Steps
1. 打开 cc switch
1. Open cc switch
启动 cc switch 应用程序。 Launch cc switch application.

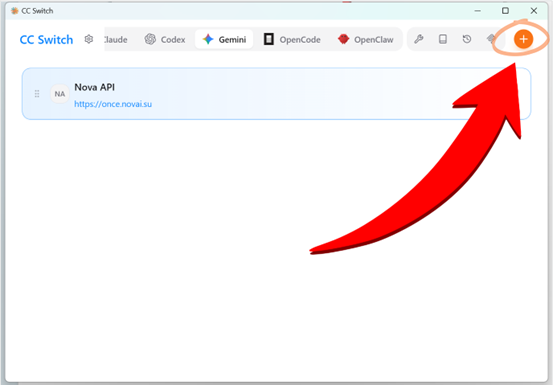
2. 点击右上角加号
2. Click Plus Icon
在界面右上角找到并点击加号按钮,添加新的供应商配置。 Find and click the plus button in the top right corner to add a new provider.

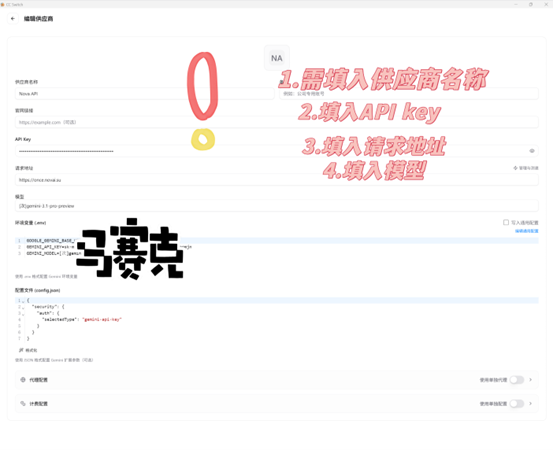
3. 填写配置信息
3. Fill Configuration
- 供应商名称:随意填写(例如:Frog API) Provider Name: Any name (e.g., Frog API)
- API Key:填入您的站点令牌秘钥 API Key: Enter your site token
- 请求地址:
https://www.frog-api.comRequest URL:https://www.frog-api.com - 主模型:
claude-opus-4-6Main Model:claude-opus-4-6

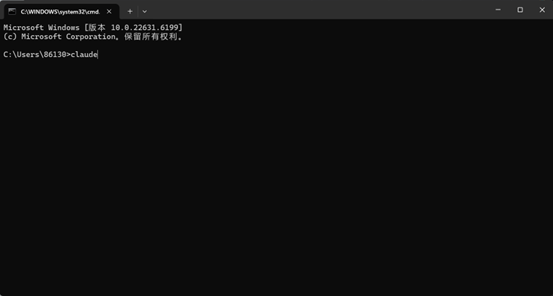
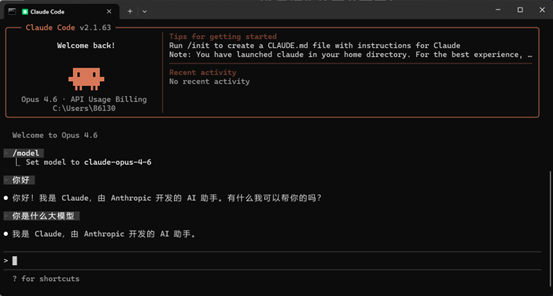
4. 命令行启动 Claude Code
4. Start Claude Code via CLI
在命令行中启动 Claude Code。 Start Claude Code from command line.
5. 切换模型
5. Switch Model
进入后输入 /model 切换到刚刚设定的模型名称。
Enter /model to switch to the configured model.
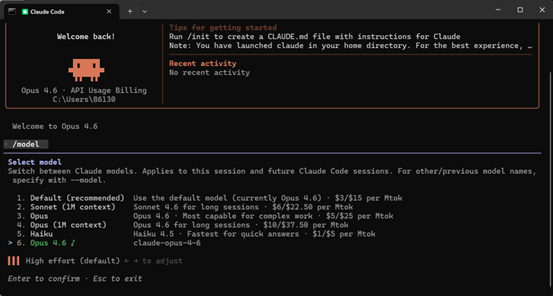
6. 开始使用
6. Start Using
回车确定选中后即可开始正常使用 Claude Code。 Press Enter to confirm and start using Claude Code.
CC Switch 配置教程
CC Switch Configuration
GitHub farion1231/cc-switch v3.11.1(单击跳转下载!)1. Claude 配置
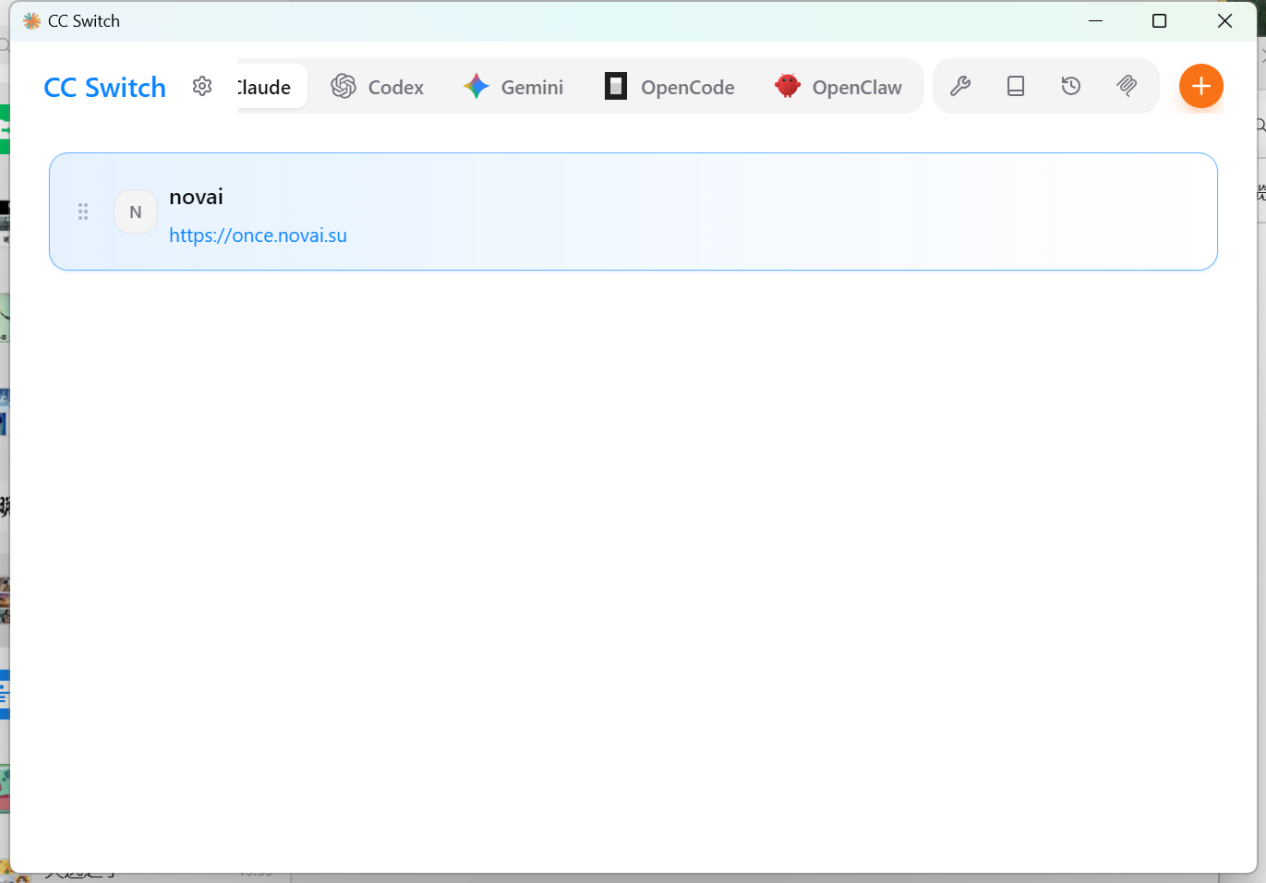
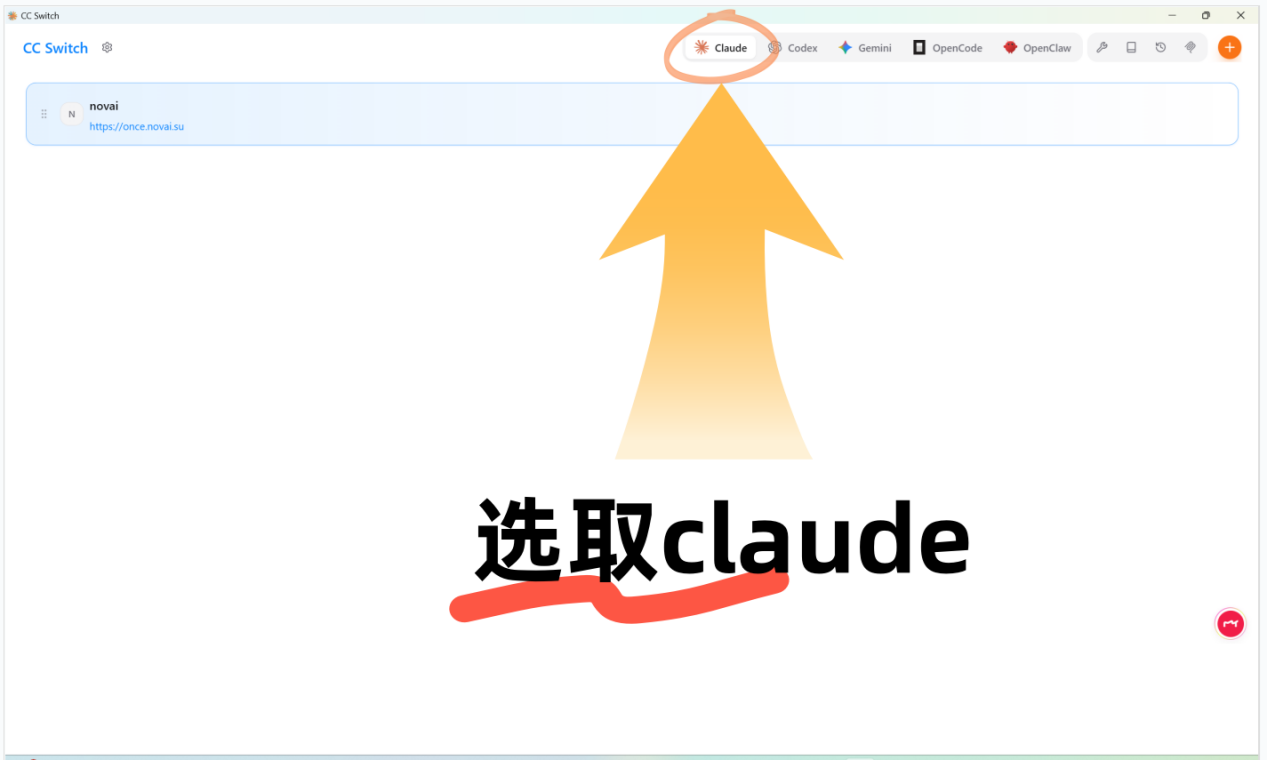
1. Claude Configuration
打开 cc switch 并选择 Claude
Open cc switch and select Claude
启动 cc switch,根据所使用插件进行配置,选择 Claude。 Launch cc switch and select Claude based on your plugin.
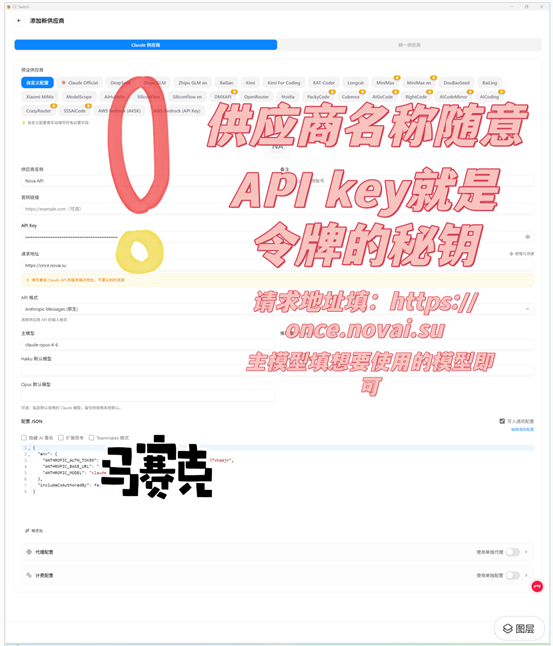
点击右上角加号添加配置
Click Plus to Add Configuration
- 供应商名称:随意填写 Provider Name: Any name
- API Key:站点令牌秘钥 API Key: Site token
- 请求地址:
https://www.frog-api.comRequest URL:https://www.frog-api.com - API 格式:anthropic messages(原生) API Format: anthropic messages (native)
- 主模型:
claude-opus-4-6Main Model:claude-opus-4-6

2. Gemini 配置
2. Gemini Configuration
打开 cc switch 并选择 Gemini
Open cc switch and select Gemini
在 cc switch 中选择 Gemini 插件。 Select Gemini plugin in cc switch.

点击右上角加号添加配置
Click Plus to Add Configuration
- 供应商名称:随意填写 Provider Name: Any name
- API Key:站点令牌秘钥 API Key: Site token
- 请求地址:
https://www.frog-api.comRequest URL:https://www.frog-api.com - 主模型:
[次]gemini-3.1-pro-previewMain Model:[次]gemini-3.1-pro-preview
3. OpenCode 配置
3. OpenCode Configuration
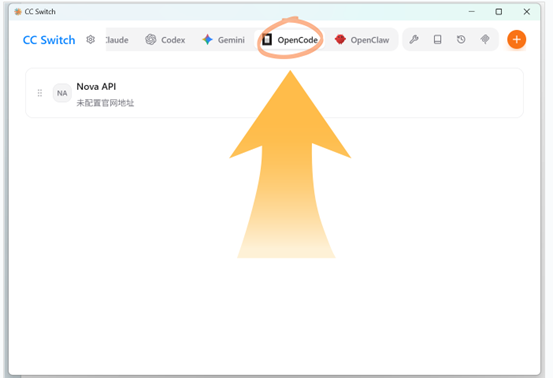
打开 cc switch 并选择 OpenCode
Open cc switch and select OpenCode
在 cc switch 中选择 OpenCode 插件。 Select OpenCode plugin in cc switch.
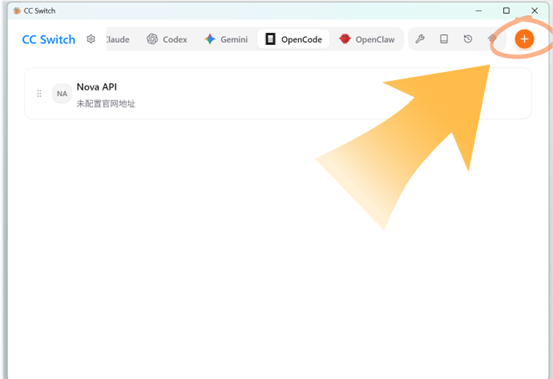
点击右上角加号添加配置
Click Plus to Add Configuration
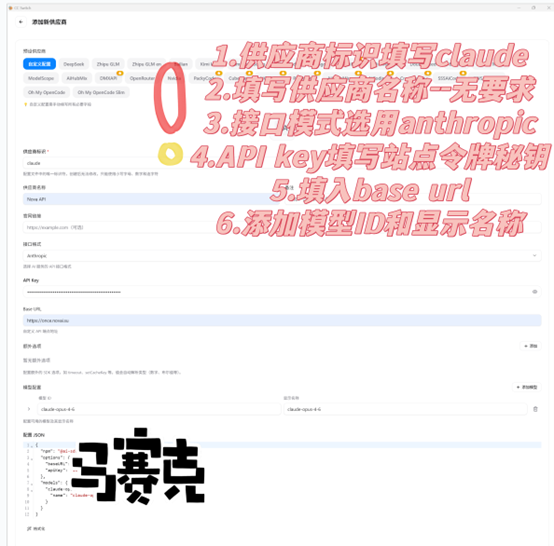
- 供应商标识:claude Provider ID: claude
- 供应商名称:随意填写 Provider Name: Any name
- API Key:站点令牌秘钥 API Key: Site token
- 请求地址:
https://www.frog-api.comRequest URL:https://www.frog-api.com - 主模型:
claude-opus-4-6Main Model:claude-opus-4-6 - 显示名称:
claude-opus-4-6Display Name:claude-opus-4-6
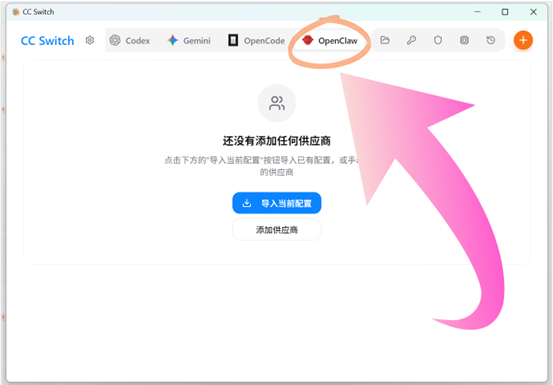
4. OpenClaw 配置
4. OpenClaw Configuration
选择 OpenClaw 界面
Select OpenClaw Interface
在 cc switch 中选择 OpenClaw 插件界面。 Select OpenClaw plugin interface in cc switch.
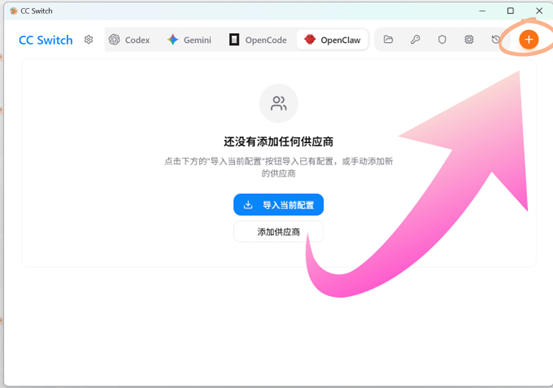
点击右上角加号添加配置
Click Plus to Add Configuration
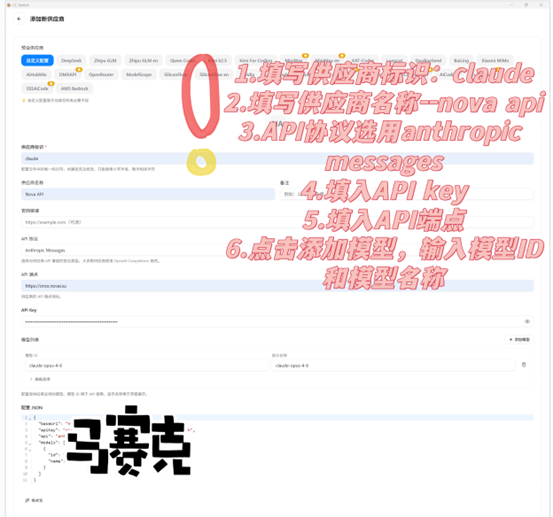
- 供应商标识:claude Provider ID: claude
- 供应商名称:Frog API Provider Name: Frog API
- API 协议:anthropic messages API Protocol: anthropic messages
- API Key:站点令牌秘钥 API Key: Site token
- API 端点:
https://www.frog-api.comAPI Endpoint:https://www.frog-api.com - 模型 ID:
claude-opus-4-6Model ID:claude-opus-4-6 - 模型名称:
claude-opus-4-6Model Name:claude-opus-4-6
Gemini CLI 配置指南
Gemini CLI Setup
🎬 Gemini CLI 配置教程
安装步骤
Installation Steps
1. 安装 Node.js
1. Install Node.js
访问 Node.js 官网,建议下载左侧的 LTS 版本,它是长期支持版,更加稳定。 Visit Node.js official website, download the LTS version on the left for better stability.
2. 安装 Git
2. Install Git
访问 Git 官网,页面会自动推荐适合你操作系统的版本,点击按钮即可下载。 Visit Git official website, the page will automatically recommend the version for your OS.
3. 安装 Gemini CLI
3. Install Gemini CLI
打开 cmd 命令行,通过 npm 安装 gemini-cli: Open cmd and install gemini-cli via npm:
npm install -g @google/gemini-cli配置步骤
Configuration Steps
配置 (.env)
Configure (.env)
创建配置文件 (Windows: %USERPROFILE%\.gemini\.env, Mac/Linux: ~/.gemini/.env)
Create config file at ~/.gemini/.env
GOOGLE_GEMINI_BASE_URL=https://www.frog-api.com
GEMINI_API_KEY=sk-xxxxxxxx
GEMINI_MODEL=gemini-2.5-pro启动
Start
geminiCodeX CLI 配置指南
CodeX CLI Setup
添加 agents.defaults(关键步骤)
Add agents.defaults (Key Step)
还需要告知 OpenClaw 优先使用该节点: Tell OpenClaw to use this provider by default:
"agents": {
  "defaults": {
    "model": {
      "primary": "claude/claude-opus-4-6"
    },
    "models": {
      "claude/claude-opus-4-6": {
        "alias": "claude-opus-4-6"
      }
    }
  }
}
4. 启动
4. Start
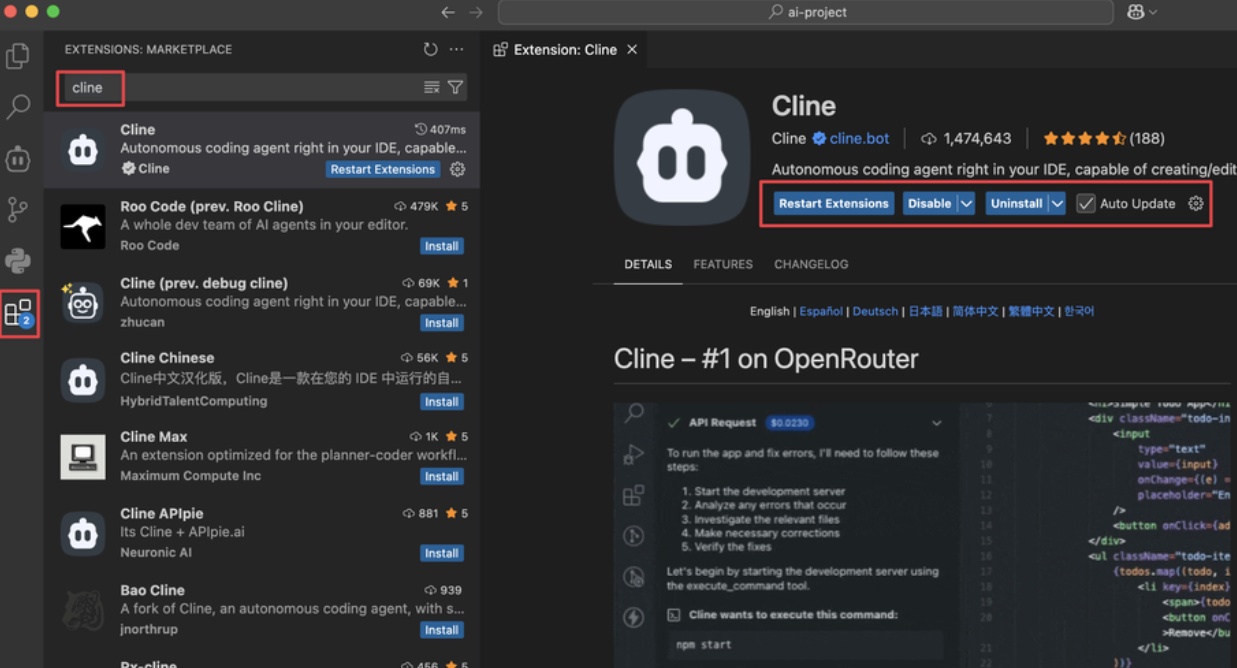
codexVS Code (Cline)
🎬 Cline 配置教程
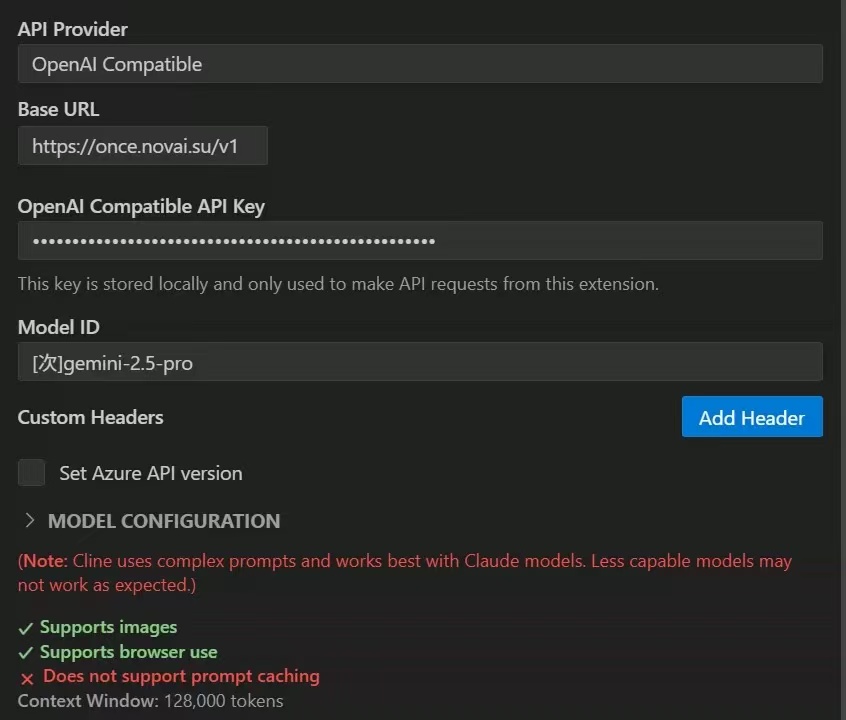
配置步骤
Configuration
- 安装 Cline 插件。
- API Provider: OpenAI Compatible
- Base URL:
https://www.frog-api.com/v1 - API Key: 填入您的令牌
- Model ID:
[次]gemini-2.5-pro
OpenClaw 配置指南
OpenClaw Setup
Website https://openclaw.ai/(官网单击跳转!) GitHub openclaw/openclaw(GitHub 仓库)🎬 OpenClaw 配置教程
配置文件下载
Configuration File Download
openclaw.json(点击下载完整配置文件 - Windows版) openclaw.json(点击下载完整配置文件 - Mac版)阿里云配置教程
Alibaba Cloud Configuration
配置 JSON 文件
Configure JSON File
使用以下 JSON 配置模板,替换教程中的文本为下方文本,并替换自己的密钥: Use the following JSON configuration template, replace the tutorial text with the content below, and replace with your own API key:
"models": {
  "providers": {
    "claude": {
      "baseUrl": "https://www.frog-api.com",
      "apiKey": "sk-xxxxxxx秘钥",
      "api": "anthropic-messages",
      "models": [
        {
          "id": "claude-opus-4-6",
          "name": "claude-opus-4-6",
          "reasoning": false,
          "input": ["text"],
          "cost": {
            "input": 0,
            "output": 0,
            "cacheRead": 0,
            "cacheWrite": 0
          },
          "contextWindow": 200000,
          "maxTokens": 8192
        }
      ]
    }
  }
},
"agents": {
  "defaults": {
    "model": {
      "primary": "claude/claude-opus-4-6"
    },
    "models": {
      "claude/claude-opus-4-6": {
        "alias": "claude-opus-4-6"
      }
    }
  }
}- 将
sk-xxxxxxx秘钥替换为您从 Frog API 网站获取的实际令牌 Replacesk-xxxxxxx秘钥with your actual token from Frog API - baseUrl 使用
https://www.frog-api.comUsehttps://www.frog-api.comas baseUrl - api 协议选择
anthropic-messagesUseanthropic-messagesas API protocol - 模型使用
claude-opus-4-6Useclaude-opus-4-6model
腾讯云配置教程
Tencent Cloud Configuration
在自定义服务器里面选择自定义模型配置
Select Custom Model Configuration in Custom Server
打开 OpenClaw,进入自定义服务器设置,选择自定义模型配置选项。 Open OpenClaw, go to custom server settings, and select custom model configuration.
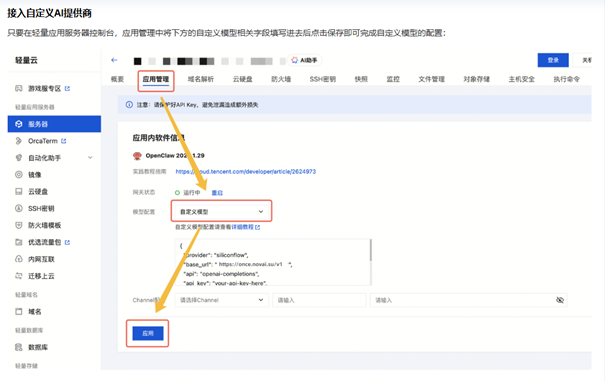
配置自定义 JSON 文件
Configure Custom JSON File
使用以下 JSON 配置模板: Use the following JSON configuration template:
{
  "provider": "openai",
  "base_url": "https://www.frog-api.com",
  "api": "anthropic-messages",
  "api_key": "sk-xxxxxxxxx",
  "model": {
    "id": "claude-opus-4-6",
    "name": "claude-opus-4-6"
  }
}
通用配置模板
Universal Configuration Template
如果需要其他模型,可以使用以下通用模板接入任何兼容 OpenAI/Anthropic (openai-completions/anthropic-messages) 协议的模型: For other models, use this universal template to connect any OpenAI/Anthropic compatible model:
{
  "provider": "openai",
  "base_url": "https://www.frog-api.com",
  "api": "anthropic-messages",
  "api_key": "sk-xxxxxxxxx",
  "model": {
    "id": "claude-opus-4-6",
    "name": "claude-opus-4-6"
  }
}- provider: 提供商名称(可自定义) provider: Provider name (customizable)
- base_url: API 接入点 base_url: API endpoint
- api: API 协议类型(openai-completions 或 anthropic-messages) api: API protocol type (openai-completions or anthropic-messages)
- api_key: 您的 Frog API 令牌 api_key: Your Frog API token
- model.id: 模型标识符 model.id: Model identifier
- model.name: 模型显示名称 model.name: Model display name
一、本地部署
1. Local Deployment
安装 Node.js
Install Node.js
访问 nodejs.org 下载 LTS 长期支持版(稳定性强,适合开发/生产环境)。页面会自动识别你的系统,直接点下载按钮就行。 Visit nodejs.org to download LTS version.
安装 Git
Install Git
访问 git-scm.com 下载安装。Windows 建议选 64 位版本,安装时默认选项基本够用。 Visit git-scm.com to download and install.
验证安装
Verify Installation
安装完成后,打开命令行(Windows 用 CMD/PowerShell,Mac/Linux 用终端),分别输入以下命令,能显示版本号就是安装成功: After installation, open terminal and run these commands to verify:
node -v
npm -v
安装 OpenClaw
Install OpenClaw
npm i -g openclaw二、核心配置流程
2. Core Configuration
定位配置文件
Locate Config File
OpenClaw 的配置在 openclaw.json 中。请根据您的操作系统找到它:
OpenClaw config is in openclaw.json. Find it based on your OS:
| 操作系统 | 默认路径 |
|---|---|
| Windows | C:\Users\<Your_Username>\.openclaw\openclaw.json |
| macOS / Linux | ~/.openclaw/openclaw.json |
添加自定义 Provider(关键步骤)
Add Custom Provider (Key Step)
在配置文件中,将以下 JSON 代码片段加入到 models.providers 块中。根据您的需求选择配置:
Add the following JSON to models.providers block. Choose based on your needs:
"models": {
  "providers": {
    "claude": {
      "baseUrl": "https://www.frog-api.com",
      "apiKey": "sk-xxxxxx你的网站获取的秘钥",
      "api": "anthropic-messages",
      "models": [
        {
          "id": "claude-opus-4-6",
          "name": "claude-opus-4-6",
          "reasoning": false,
          "input": ["text"],
          "cost": {
            "input": 0,
            "output": 0,
            "cacheRead": 0,
            "cacheWrite": 0
          },
          "contextWindow": 200000,
          "maxTokens": 8192
        }
      ]
    }
  }
}
添加 agents.defaults(关键步骤)
Add agents.defaults (Key Step)
还需要告知 OpenClaw 优先使用该节点。根据上面选择的 Provider 配置对应的 defaults: Tell OpenClaw to use this provider by default. Configure based on your chosen provider:
"agents": {
  "defaults": {
    "model": {
      "primary": "claude/claude-opus-4-6"
    },
    "models": {
      "claude/claude-opus-4-6": {
        "alias": "claude-opus-4-6"
      }
    }
  }
}
配置文件下载
Configuration File Download
在配置文件中,将以下 JSON 代码片段加入到 models.providers 块中:
Add the following JSON to models.providers block:
三、启动服务
3. Start Service
启动网关服务
Start Gateway Service
openclaw gateway打开链接
Open Link
还需要告知 OpenClaw 优先使用该节点: Tell OpenClaw to use this provider by default:
OpenCode 配置指南
OpenCode Setup
Website https://opencode.ai(单击跳转!)🎬 OpenCode 配置教程
配置步骤
Configuration Steps
创建配置文件
Create Config File
在项目根目录创建 opencode.json 配置文件:
Create opencode.json config file in project root:
{
  "$schema": "https://opencode.ai/config.json",
  "theme": "opencode",
  "provider": {
    "google": {
      "options": {
        "apiKey": "YOUR_API_KEY_HERE",
        "baseURL": "https://www.frog-api.com/v1"
      }
    }
  },
  "model": "google/gemini-3-pro-preview",
  "autoupdate": true
}
配置说明
Configuration Details
- apiKey:将
YOUR_API_KEY_HERE替换为您的 Frog API 令牌 apiKey: ReplaceYOUR_API_KEY_HEREwith your Frog API token - baseURL:API 接入点
https://www.frog-api.com/v1baseURL: API endpointhttps://www.frog-api.com/v1 - model:使用
google/gemini-3-pro-preview模型 model: Usegoogle/gemini-3-pro-previewmodel
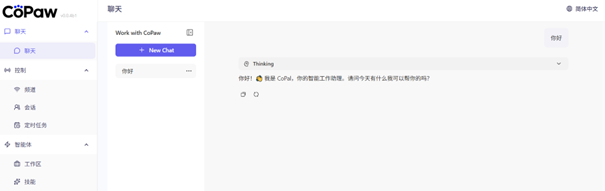
Copaw 配置指南
Copaw Setup
Website https://copaw.agentscope.io/docs/quickstart(配置安装教程)配置步骤
Configuration Steps
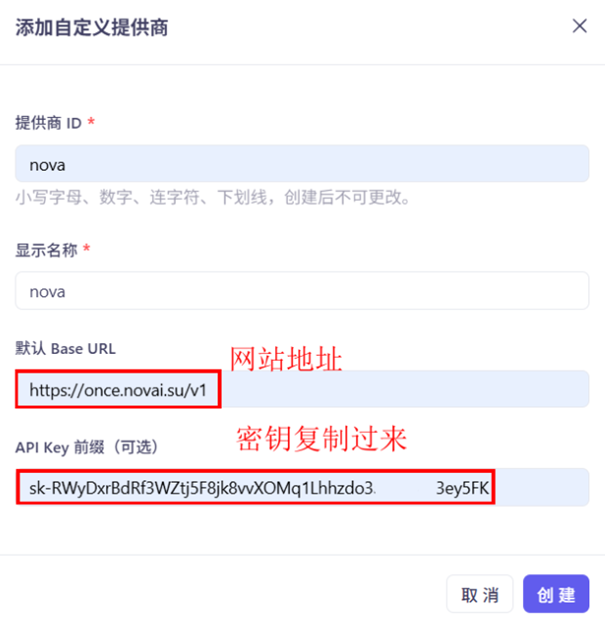
1. 选择模型添加供应商
1. Select Model and Add Provider
在 Copaw 中选择模型,然后添加供应商配置。 Select a model in Copaw and add provider configuration.
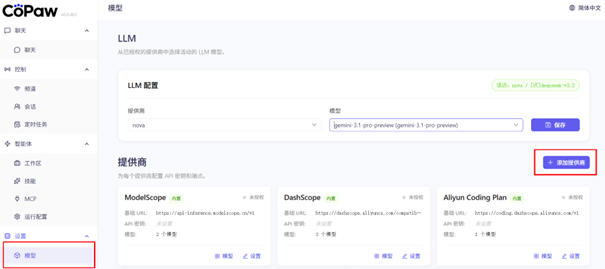
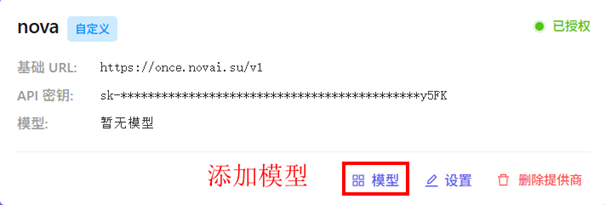
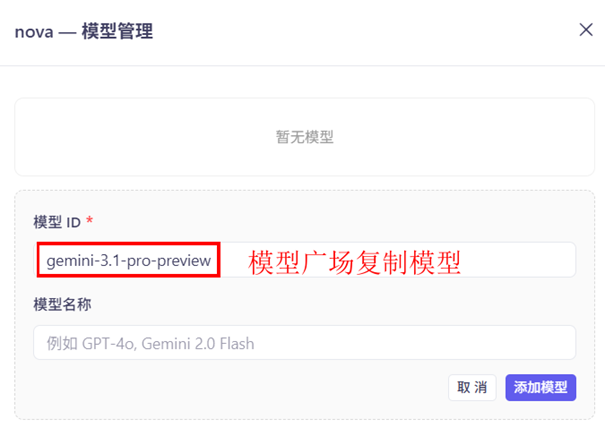
2. 新建并添加模型
2. Create and Add Model
创建新的模型配置,填写从 Frog API 网站模型广场复制的模型名称(按量模型)。 Create new model configuration and enter the model name copied from Frog API model marketplace (pay-per-use model).
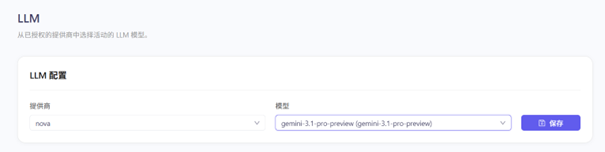
3. 配置 API 信息
3. Configure API Information
- API 地址:
https://www.frog-api.com/v1API URL:https://www.frog-api.com/v1 - API Key: 填入您的 Frog API 令牌 API Key: Enter your Frog API token
- 模型名称: 从模型广场复制的按量模型名称 Model Name: Pay-per-use model name from marketplace
4. 保存设置
4. Save Settings
保存配置后即可开始使用 Copaw 进行聊天。 After saving the configuration, you can start chatting with Copaw.
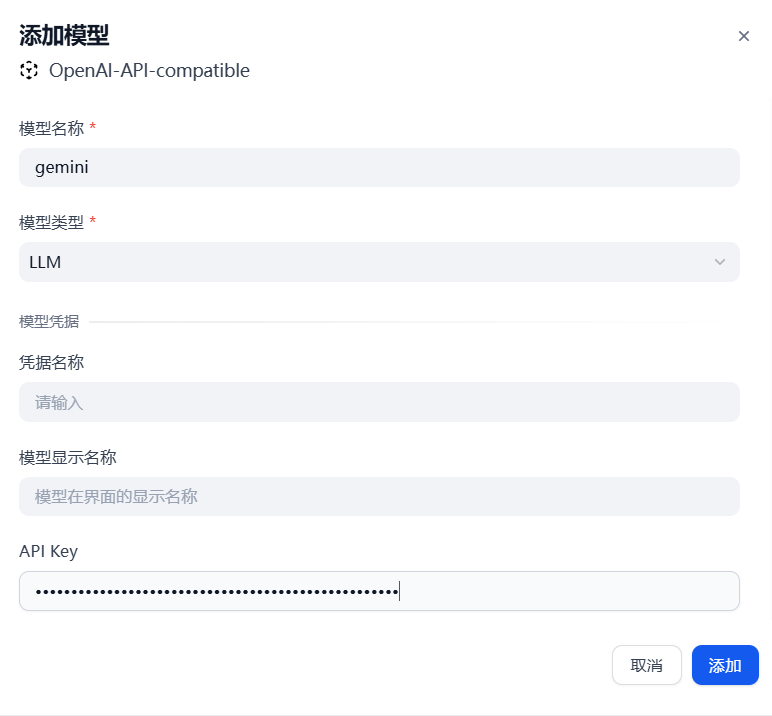
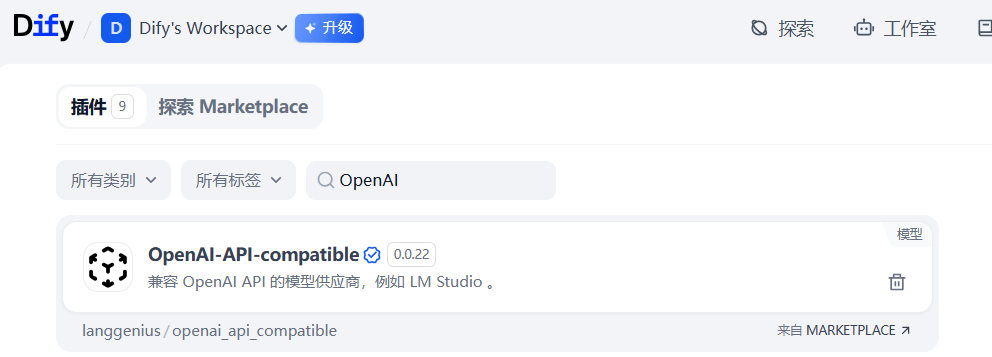
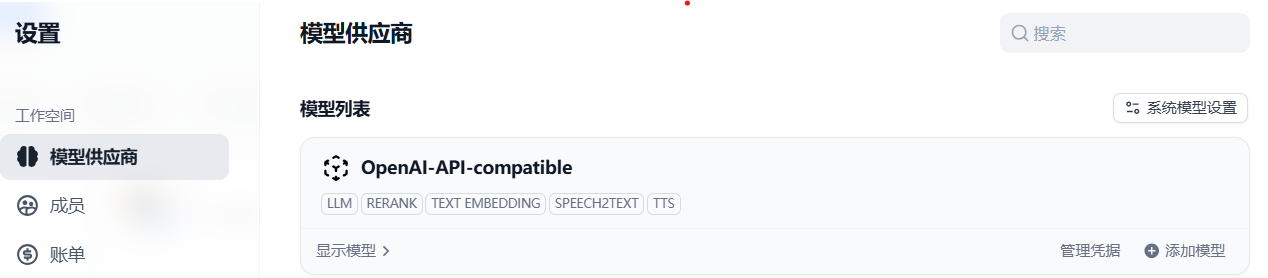
Dify
配置步骤
Configuration
- 设置 -> 模型供应商 -> OpenAI-API-compatible
- URL:
https://www.frog-api.com/v1 - API Key: 填入您的令牌
- Model:
[次]gemini-2.5-pro


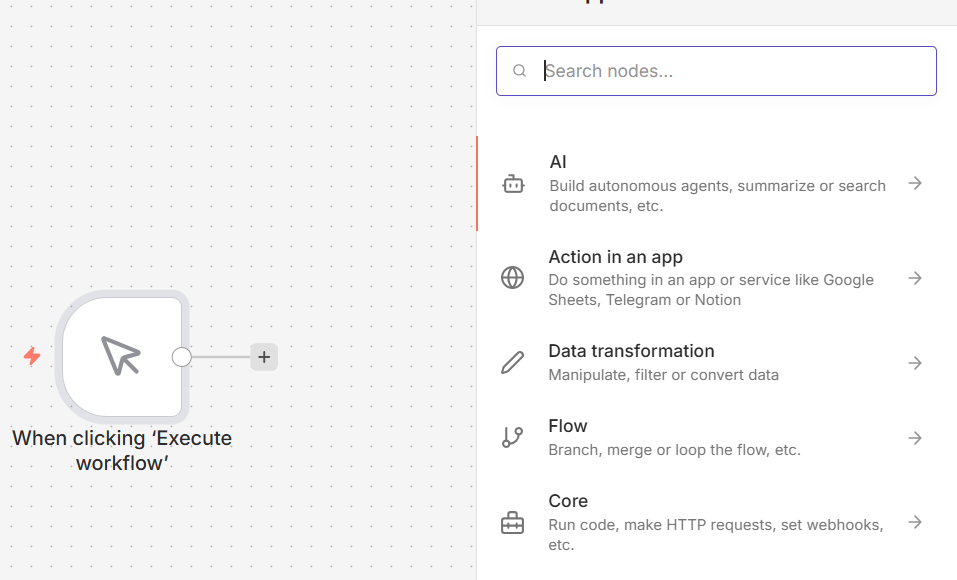
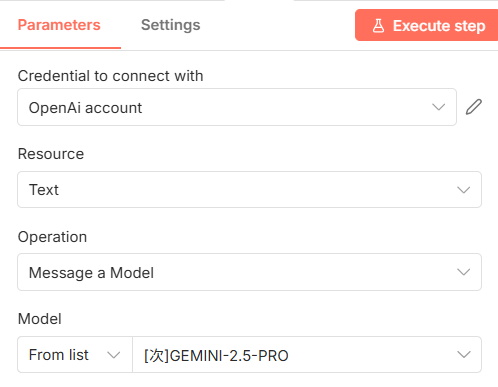
n8n
🎬 n8n 配置教程
配置步骤
Configuration
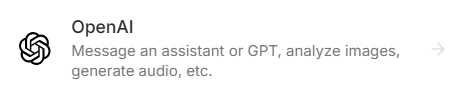
- 添加 OpenAI 模块 -> Message a model
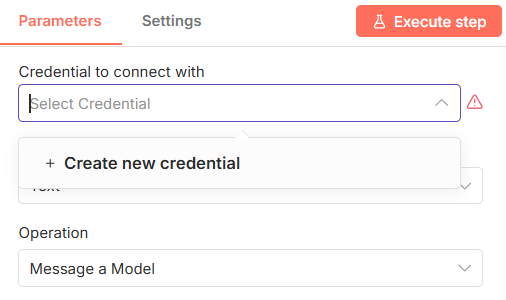
- Credential: Create New -> Custom
- URL:
https://www.frog-api.com/v1 - API Key: 填入您的令牌
- Model:
[次]gemini-2.5-pro


Easydict (macOS)
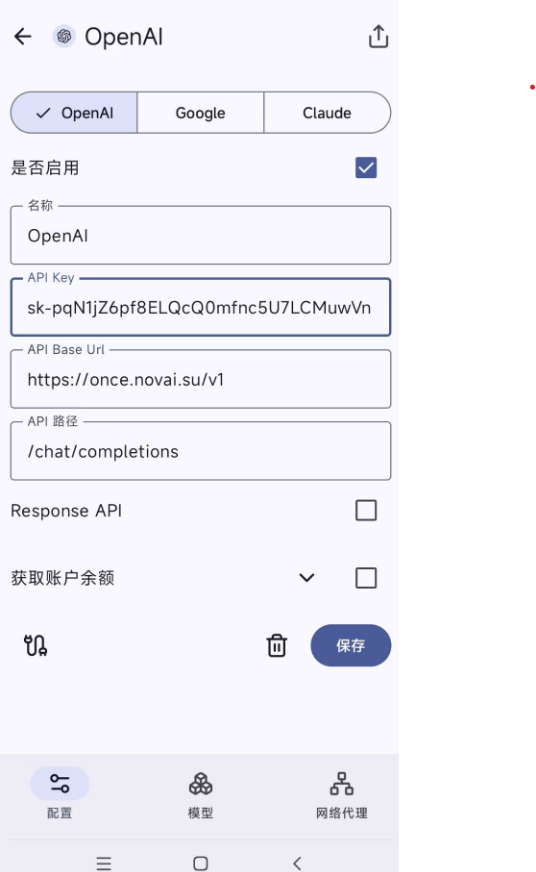
配置步骤
Configuration
- 服务: OpenAI 翻译
- API Key: 填入您的令牌
- 完整地址 (Full URL):
https://www.frog-api.com/v1/chat/completions - Model:
[次]gemini-2.5-pro

Python SDK
🎬 Python SDK 配置教程
from openai import OpenAI

# 初始化客户端
client = OpenAI(
    api_key="sk-xxxxxxxx",              # 填入您的令牌
    base_url="https://www.frog-api.com/v1" # API 接入点
)

# 发送请求
response = client.chat.completions.create(
    model="[次]gemini-2.5-pro",
    messages=[
        {"role": "system", "content": "You are a helpful assistant."},
        {"role": "user", "content": "Hello!"}
    ],
    stream=False
)

print(response.choices[0].message.content)
🎬 Python 分析视频教程
import cv2
import base64
import requests
import os
import math

class VideoAnalyzer:
    def __init__(self, video_path):
        self.video_path = video_path
        if not os.path.exists(video_path):
            raise FileNotFoundError(f"❌ 找不到视频文件: {video_path}")

    def get_metadata(self):
        """1. 获取视频基础技术参数"""
        cap = cv2.VideoCapture(self.video_path)

        if not cap.isOpened():
            return None

        fps = cap.get(cv2.CAP_PROP_FPS)
        frame_count = int(cap.get(cv2.CAP_PROP_FRAME_COUNT))
        width = int(cap.get(cv2.CAP_PROP_FRAME_WIDTH))
        height = int(cap.get(cv2.CAP_PROP_FRAME_HEIGHT))
        duration = frame_count / fps if fps > 0 else 0

        cap.release()

        return {
            "width": width,
            "height": height,
            "fps": round(fps, 2),
            "frame_count": frame_count,
            "duration_sec": round(duration, 2),
            "file_size_mb": round(os.path.getsize(self.video_path) / (1024 * 1024), 2)
        }

    def extract_keyframes(self, max_frames=5, target_width=512):
        """2. 抽取关键帧用于AI分析"""
        print("📸 正在抽取关键帧...")
        cap = cv2.VideoCapture(self.video_path)
        total_frames = int(cap.get(cv2.CAP_PROP_FRAME_COUNT))

        if total_frames == 0:
            return []

        interval = max(1, total_frames // max_frames)
        base64_frames = []

        for i in range(0, total_frames, interval):
            if len(base64_frames) >= max_frames:
                break

            cap.set(cv2.CAP_PROP_POS_FRAMES, i)
            ret, frame = cap.read()

            if ret:
                h, w, _ = frame.shape
                aspect_ratio = h / w
                new_height = int(target_width * aspect_ratio)
                resized_frame = cv2.resize(frame, (target_width, new_height))

                _, buffer = cv2.imencode('.jpg', resized_frame)

                base64_str = base64.b64encode(buffer).decode('utf-8')
                base64_frames.append(base64_str)

        cap.release()
        print(f"✅ 成功抽取 {len(base64_frames)} 帧关键画面")
        return base64_frames

    def analyze_content_with_ai(self, api_key, base64_frames):
        """3. 调用视觉大模型解析视频内容"""
        print("🧠 正在请求 AI 分析视频内容...")

        url = "https://www.frog-api.com/v1/chat/completions"

        content_payload = [
            {"type": "text", "text": "这是同一个视频中按时间顺序抽取的几帧画面。请详细描述这个视频里发生了什么?包括场景、人物动作、氛围和主要事件。"}
        ]

        for b64 in base64_frames:
            content_payload.append({
                "type": "image_url",
                "image_url": {
                    "url": f"data:image/jpeg;base64,{b64}",
                    "detail": "low"
                }
            })

        payload = {
            "model": "[次]gemini-3-pro-preview",
            "messages": [{"role": "user", "content": content_payload}],
            "max_tokens": 1000,
            "stream": True
        }

        try:
            response = requests.post(url, headers={"Authorization": f"Bearer {api_key}"}, json=payload, stream=True)

            print("\n📝 视频分析报告:\n" + "="*30)
            full_analysis = ""

            for line in response.iter_lines():
                if line:
                    decoded = line.decode('utf-8')
                    if decoded.startswith('data: ') and decoded != 'data: [DONE]':
                        try:
                            chunk = decoded[6:]
                            import json
                            delta = json.loads(chunk)['choices'][0]['delta'].get('content', '')
                            print(delta, end='', flush=True)
                            full_analysis += delta
                        except:
                            pass

            print("\n" + "="*30)
            return full_analysis

        except Exception as e:
            print(f"❌ 分析失败: {e}")
            return None

# 使用示例
if __name__ == "__main__":
    video_file = r"你的视频文件路径.mp4"  # 替换为你的视频文件路径
    my_api_key = "sk-xxxxxxxx"  # 替换为你的API Key

    if not os.path.exists(video_file):
        print(f"⚠️ 未找到 {video_file},请先准备一个视频文件。")
    else:
        analyzer = VideoAnalyzer(video_file)
        meta = analyzer.get_metadata()
        print(f"\n📊 视频元数据: {meta}")
        frames = analyzer.extract_keyframes(max_frames=5)
        if frames:
            analyzer.analyze_content_with_ai(my_api_key, frames)
🎬 Python 分析图片教程
import requests, json, base64

API_URL = "https://www.frog-api.com/v1/chat/completions"
API_KEY = "Bearer sk-xxxxxxxx"  # 替换为你的API Key

def analyze_image(img_path):
    """分析图片"""
    with open(img_path, "rb") as f:
        img_base64 = base64.b64encode(f.read()).decode()

    payload = {
        "model": "[次]gemini-3-pro-preview",  # 模型名称
        "messages": [{
            "role": "user",
            "content": [
                {"type": "text", "text": "请描述这张图片"},
                {
                    "type": "image_url",
                    "image_url": {"url": f"data:image/jpeg;base64,{img_base64}"}
                }
            ]
        }],
        "stream": True
    }

    headers = {
        "Content-Type": "application/json",
        "Authorization": API_KEY
    }

    response = requests.post(API_URL, json=payload, headers=headers, stream=True)
    for line in response.iter_lines():
        if line:
            line = line.decode('utf-8').replace('data: ', '')
            if line.strip() == '[DONE]': break
            try:
                data = json.loads(line)
                if content := data['choices'][0]['delta'].get('content'):
                    print(content, end="", flush=True)
            except:
                continue
    print()

# 使用示例
analyze_image(r"你的图片路径.jpg")  # 替换为实际图片路径
🎬 Python 视频生成教程
import requests
import time
import json
import os

def generate_video_stream_with_retry(prompt, api_key, max_retries=3):
    """带重试机制的流式视频生成指令获取函数"""
    base_url = "https://www.frog-api.com/v1/chat/completions"

    headers = {
        "Authorization": f"Bearer {api_key}",
        "Content-Type": "application/json"
    }

    payload = {
        "model": "veo_3_1",
        "messages": [
            {
                "role": "user",
                "content": f"请帮我生成一个视频,描述是:{prompt}。请告诉我视频生成的步骤或直接提供视频链接。"
            }
        ],
        "max_tokens": 5000,
        "temperature": 0.7,
        "stream": True
    }

    for attempt in range(max_retries):
        print(f"\n🔄 尝试 {attempt + 1}/{max_retries}...")
        full_content = ""

        try:
            response = requests.post(base_url, headers=headers, json=payload, timeout=120, stream=True)

            if response.status_code != 200:
                print(f"❌ 请求失败,状态码: {response.status_code}")
                if 500 <= response.status_code < 600:
                    print("⏳ 服务器端错误,等待后重试...")
                    time.sleep(5)
                    continue
                else:
                    return None

            print("✅ 连接成功,开始接收数据流...\n")
            print("-" * 30)

            for line in response.iter_lines():
                if line:
                    decoded_line = line.decode('utf-8')
                    if decoded_line.startswith('data: '):
                        data_str = decoded_line[6:]
                        if data_str.strip() == '[DONE]':
                            print("\n" + "-" * 30)
                            print("\n✅ 流式传输结束")
                            break
                        try:
                            data_json = json.loads(data_str)
                            delta = data_json['choices'][0]['delta'].get('content', '')
                            if delta:
                                print(delta, end='', flush=True)
                                full_content += delta
                        except json.JSONDecodeError:
                            continue

            if full_content:
                with open("ai_response.txt", "w", encoding="utf-8") as f:
                    f.write(full_content)
                print(f"📝 完整回复已保存到 ai_response.txt")
                return full_content
            else:
                print("⚠️ 未接收到任何内容")
                return None

        except requests.exceptions.Timeout:
            print("⏰ 连接超时")
            time.sleep(5)
            continue
        except Exception as e:
            print(f"❌ 未知错误: {e}")
            return None

    print(f"😞 经过 {max_retries} 次尝试后仍然失败")
    return None

# 使用示例
if __name__ == "__main__":
    my_api_key = "sk-xxxxxxxx"  # 替换为你的API Key

    result = generate_video_stream_with_retry(
        prompt="在海上冲浪的狗",
        api_key=my_api_key,
        max_retries=5
    )

    if result:
        print("\n🎬 任务完成")
    else:
        print("\n❌ 任务失败")
🎬 Python 图片生成教程
import requests
import json
import os
import re
from datetime import datetime
from pathlib import Path
from typing import Optional, Dict, Any, List
from urllib.parse import urlparse

class ImageGenerator:
    def __init__(self):
        self.api_key = "sk-xxxxxxxx"  # 替换为你的API密钥
        self.api_url = "https://www.frog-api.com/v1/chat/completions"
        self.model = "nano-banana"
        self.headers = {
            "Authorization": f"Bearer {self.api_key}",
            "Content-Type": "application/json"
        }

    def generate_image(self, prompt: str, save_dir: str = "./generated_images") -> Dict[str, Any]:
        """生成图像并返回图片链接"""
        Path(save_dir).mkdir(parents=True, exist_ok=True)

        payload = {
            "model": self.model,
            "messages": [{"role": "user", "content": f"Generate an image based on this prompt: {prompt}"}],
            "max_tokens": 1000
        }

        print(f"正在生成图像...")
        print(f"提示词: {prompt}")

        try:
            response = requests.post(self.api_url, headers=self.headers, json=payload, timeout=600)

            if response.status_code == 200:
                return self._process_response(response, prompt, save_dir)
            else:
                print(f"API请求失败: {response.status_code}")
                return {"success": False, "error": f"HTTP {response.status_code}", "image_links": []}

        except requests.exceptions.RequestException as e:
            print(f"请求异常: {e}")
            return {"success": False, "error": str(e), "image_links": []}

    def _process_response(self, response, prompt, save_dir):
        result = {"success": False, "image_links": [], "content": "", "error": None}

        try:
            response_data = response.json()
            if "choices" in response_data and response_data["choices"]:
                content = response_data["choices"][0]["message"]["content"]
                result["content"] = content
                print(f"API响应内容: {content}")

                # 提取图片链接
                url_patterns = [
                    r'https?://[^\s]+?\.(?:jpg|jpeg|png|gif|bmp|webp)',
                    r'https?://[^\s]+?/image/[^\s]+',
                ]

                found_links = []
                for pattern in url_patterns:
                    matches = re.findall(pattern, content, re.IGNORECASE)
                    found_links.extend(matches)

                if found_links:
                    result["success"] = True
                    result["image_links"] = found_links
                    print(f"找到图片链接: {found_links}")
                else:
                    result["success"] = True
                    result["note"] = "API返回的是文本描述,未找到图片链接"

        except Exception as e:
            result["error"] = f"处理响应失败: {e}"

        return result

def main():
    print("🎨 图像生成脚本")
    print("-" * 50)

    generator = ImageGenerator()
    prompt = "一只可爱的小狗在花园里玩耍"  # 修改这里的prompt内容

    result = generator.generate_image(prompt=prompt, save_dir="./test_images")

    print("\n" + "=" * 50)
    if result.get("success", False):
        print("✅ 请求成功!")
        if result.get("image_links"):
            print(f"\n📷 找到 {len(result['image_links'])} 个图片链接:")
            for i, link in enumerate(result["image_links"], 1):
                print(f"  {i}. {link}")
    else:
        print(f"❌ 生成失败: {result.get('error', '未知错误')}")

if __name__ == "__main__":
main()Cursor
Website https://cursor.com/(单击跳转下载!)🎬 Cursor 配置教程
配置指南
Configuration Guide
打开设置
Open Settings
点击右上角的齿轮图标 ⚙️,选择 Models 选项 Click the gear icon ⚙️ in the top right corner, select Models
配置 API
Configure API
- OpenAI API Key:输入您的 API 密钥(直接用默认令牌即可) OpenAI API Key: Enter your API key (use default token)
- Override OpenAI Base URL:勾选并输入
https://www.frog-api.com/v1Override OpenAI Base URL: Check and enterhttps://www.frog-api.com/v1 - 点击 Verify 验证配置 Click Verify to validate configuration
- 输入模型名称:
gemini-2.5-proEnter model name:gemini-2.5-pro
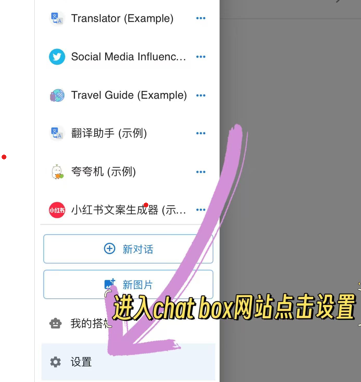
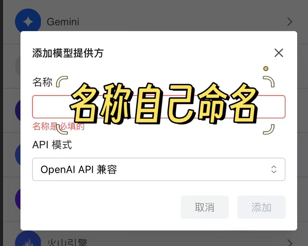
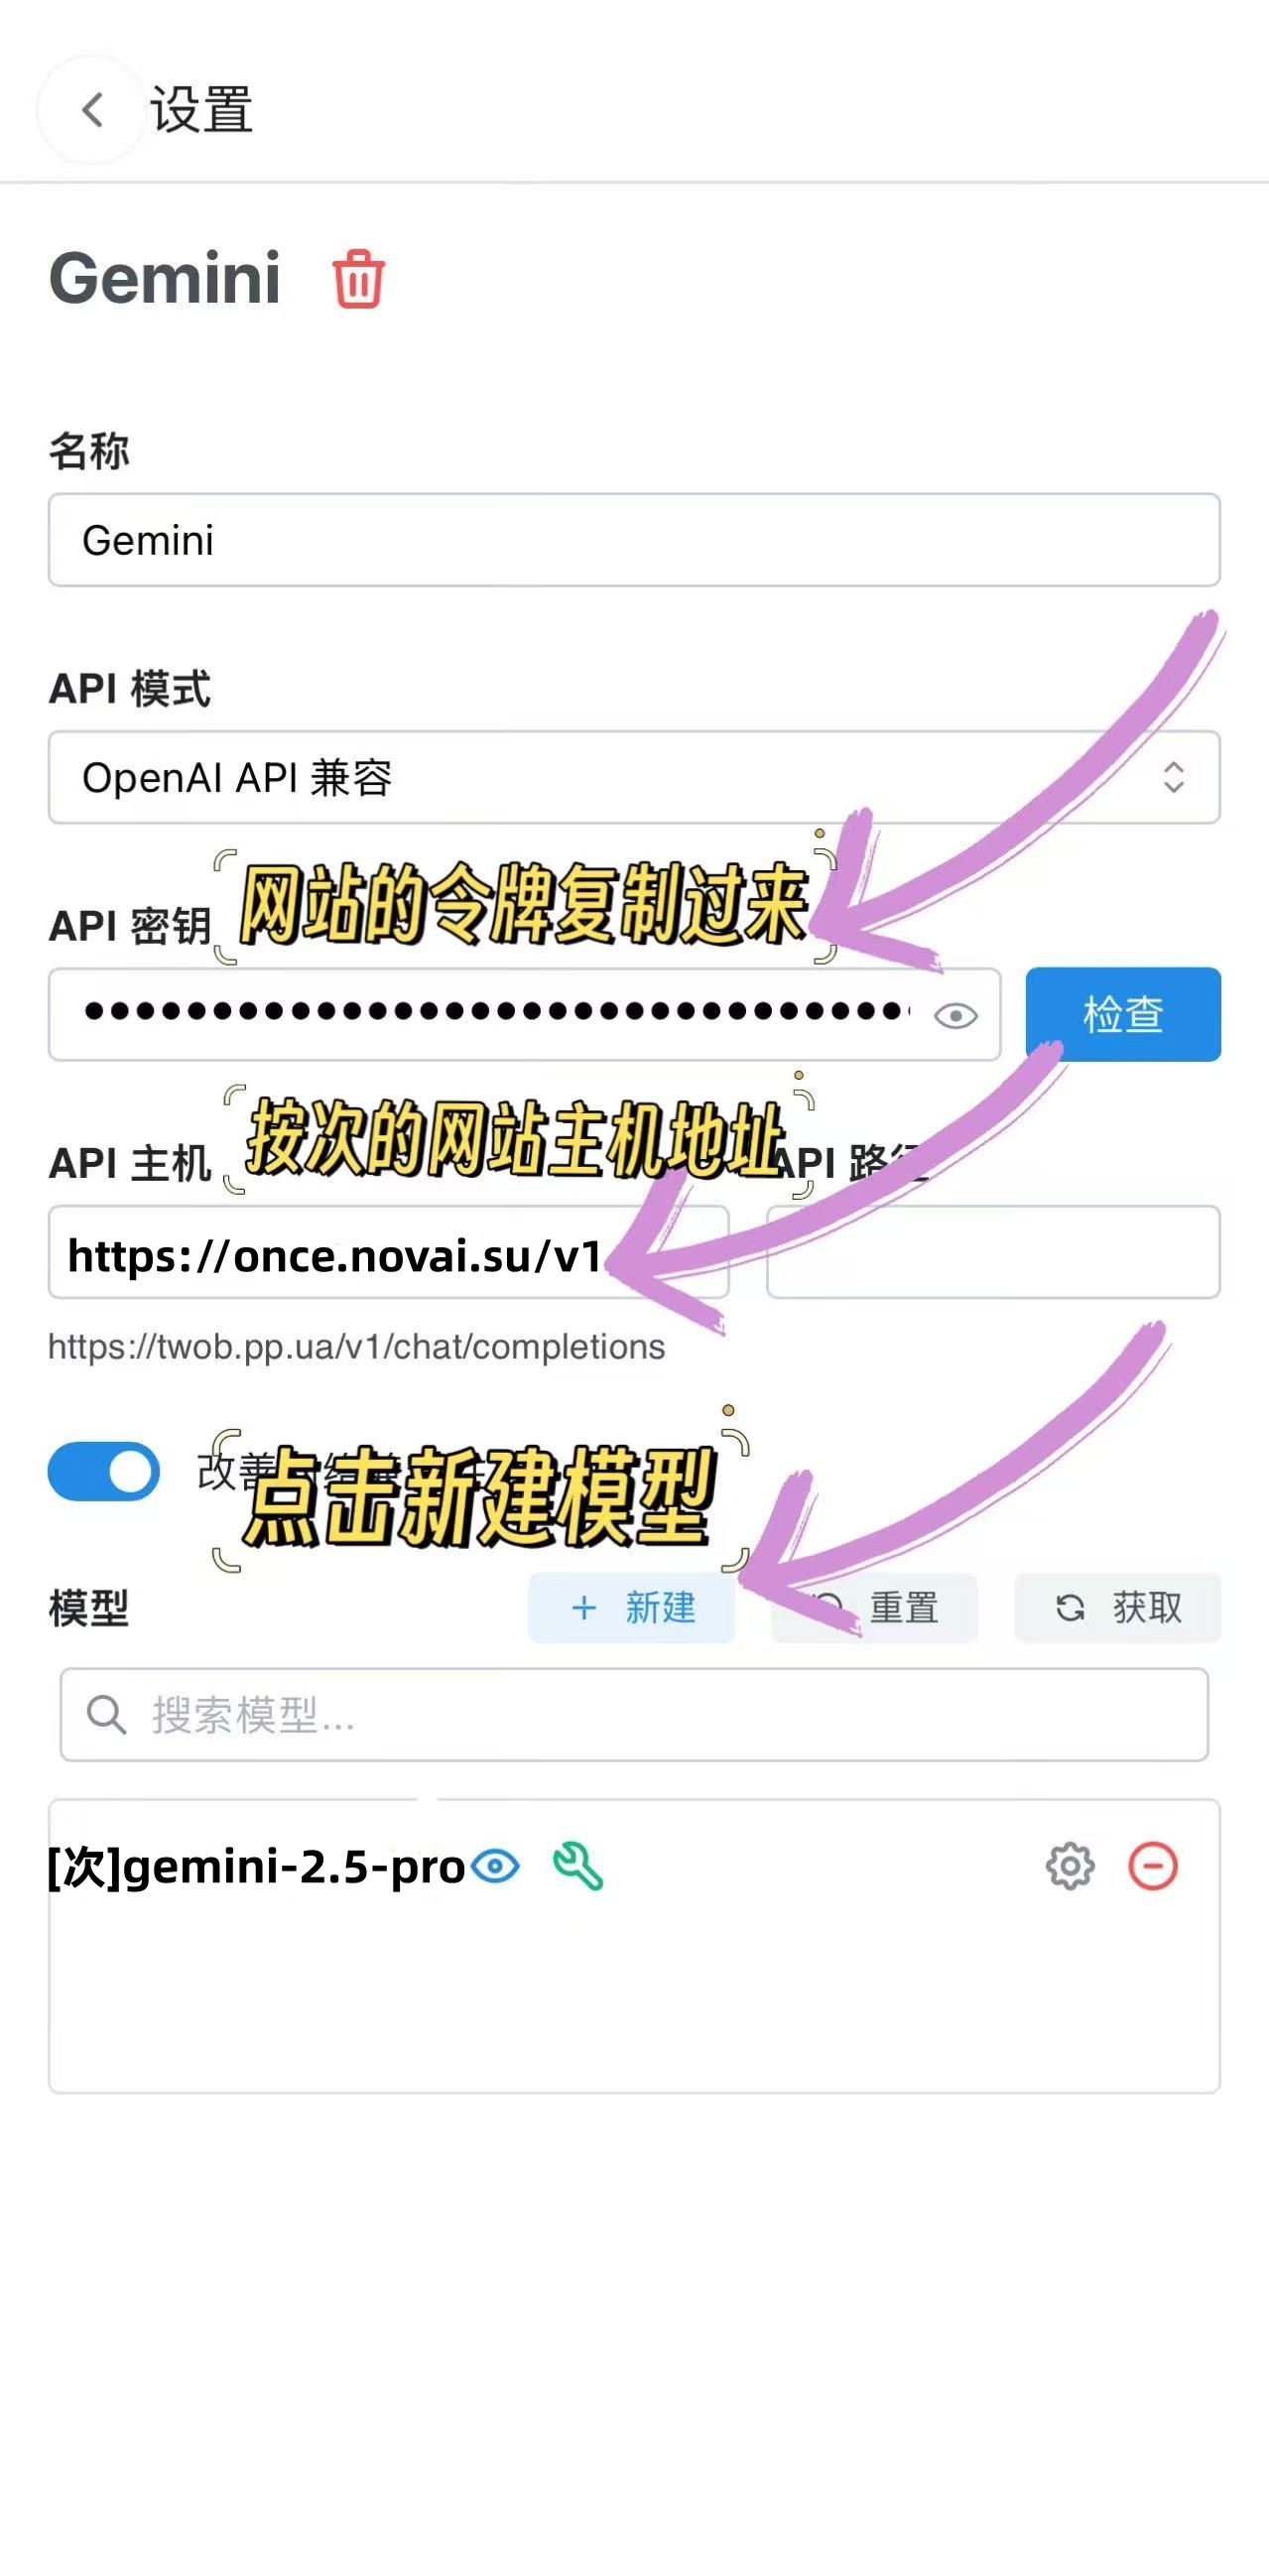
Chatbox
Website https://chatboxai.app(单击跳转!)🎬 Chatbox 电脑端配置教程
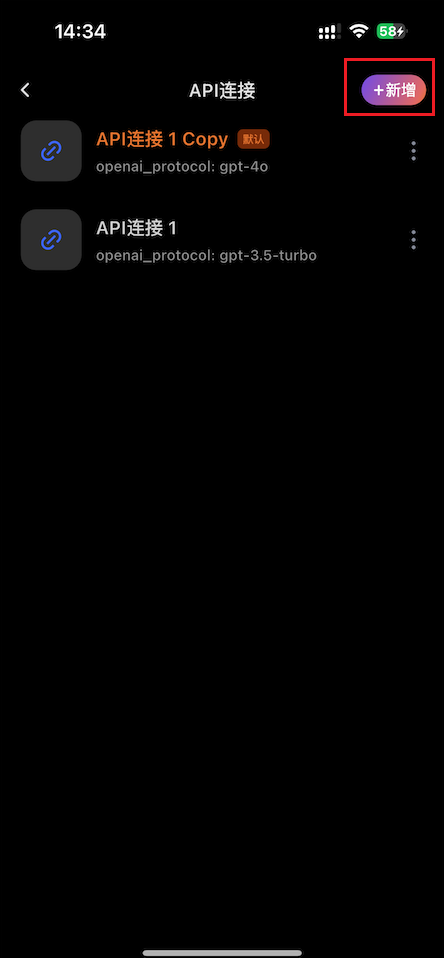
🎬 Chatbox 手机端配置教程
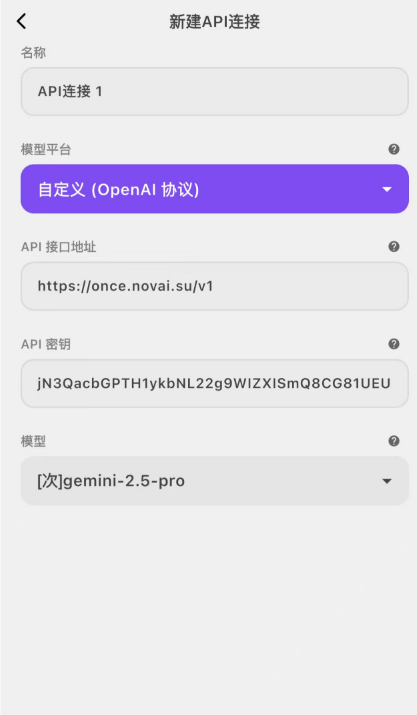
配置步骤
Configuration
- 设置 -> 模型提供方 -> 手动添加配置 (Custom)
- API 模式:OpenAI API 兼容
- API Host:
https://www.frog-api.com/v1 - API Key: 填入您的令牌
- 模型 (Model):
[次]gemini-2.5-pro - 注意:勾选所有模型能力,开启"改善网络兼容性"。

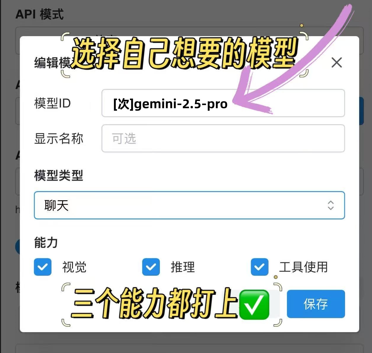


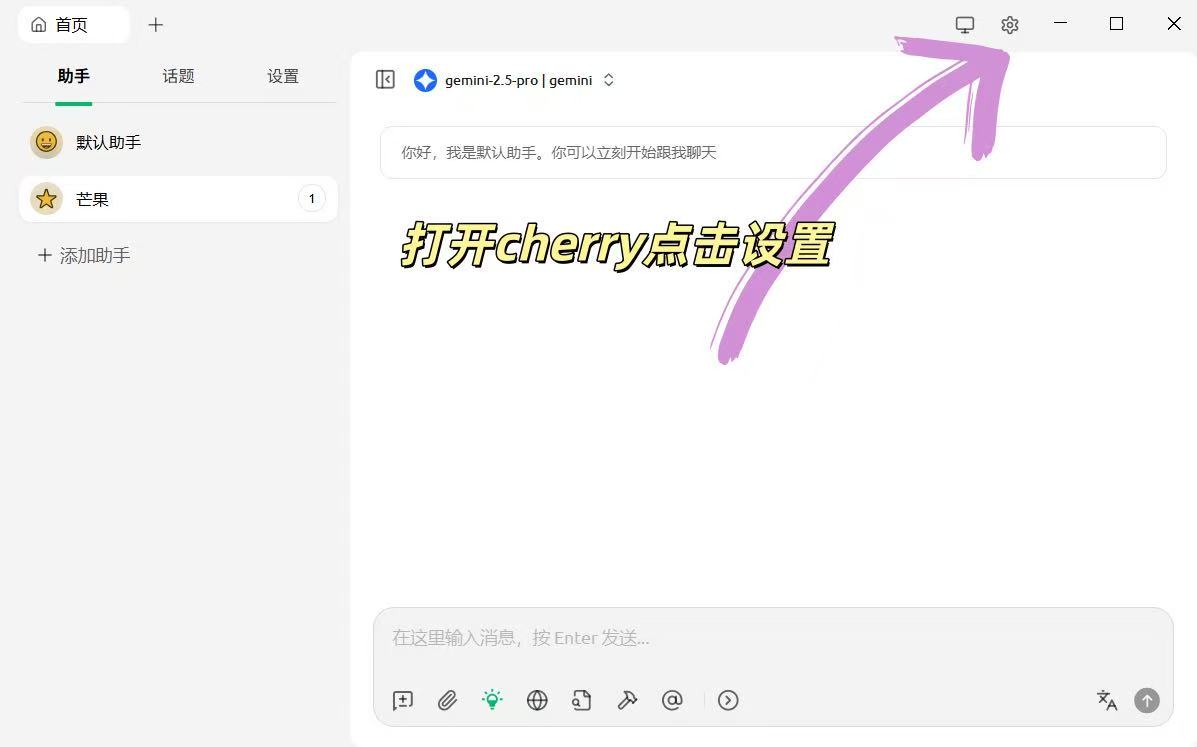
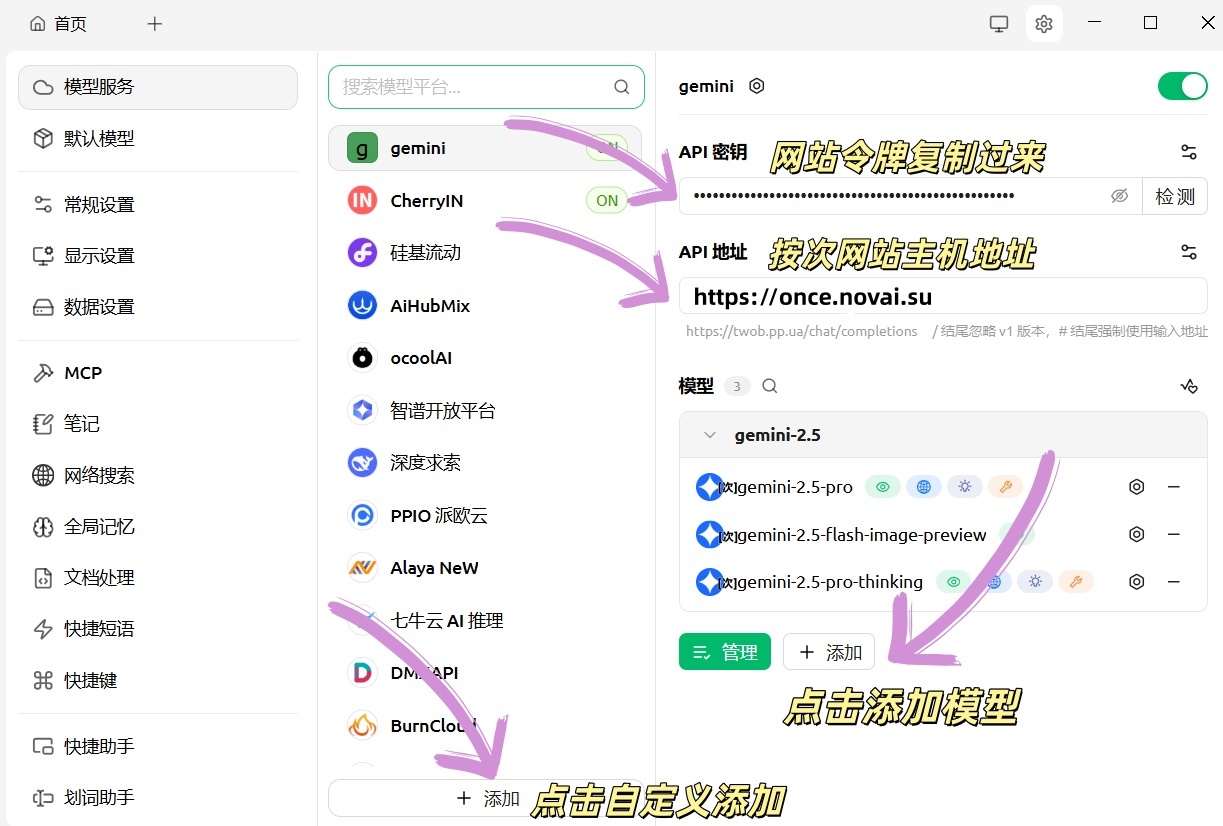
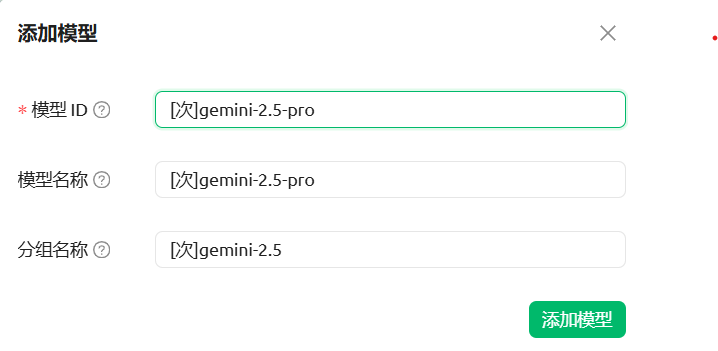
Cherry Studio
Website https://cherry-ai.com(单击跳转!)🎬 Cherry Studio 配置教程
配置步骤
Configuration
- 设置 -> 手动自定义创建
- API 地址:
https://www.frog-api.com - API 密钥: 填入您的令牌
- 模型名称:
[次]gemini-2.5-pro
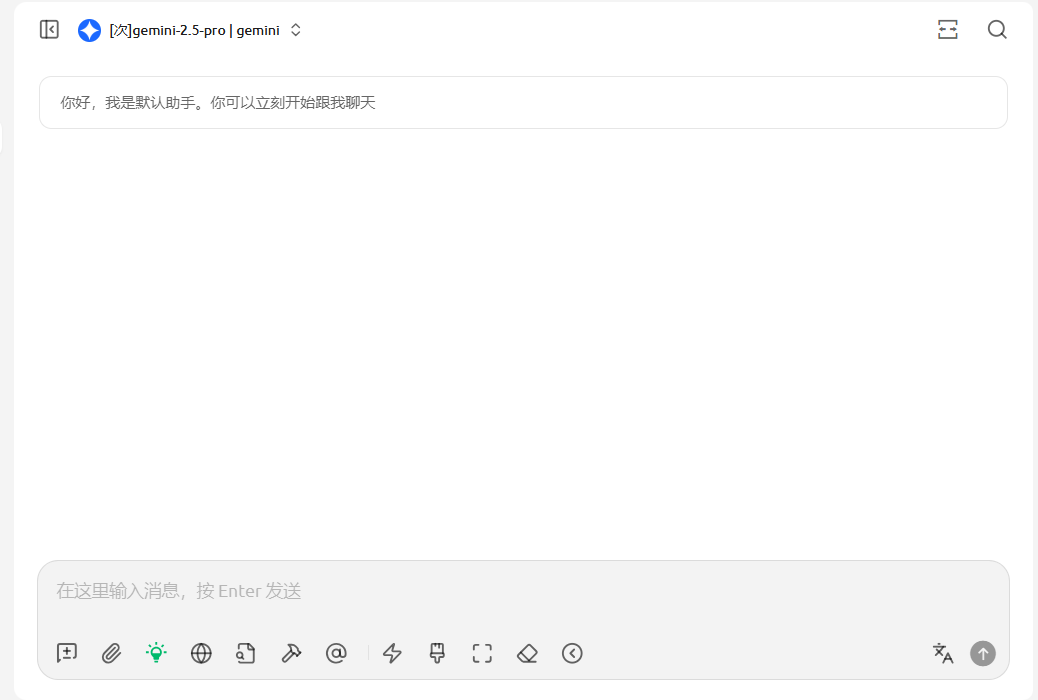
酒馆 (SillyTavern)
SillyTavern
配置步骤
Configuration
- API 来源: Custom (OpenAI Compatible)
- API Endpoint:
https://www.frog-api.com/v1 - API Key: 填入您的令牌
- Model:
[次]gemini-2.5-pro


安卓 SillyTavern 酒馆安装教程
Android SillyTavern Installation
🎬 安卓 SillyTavern 配置教程
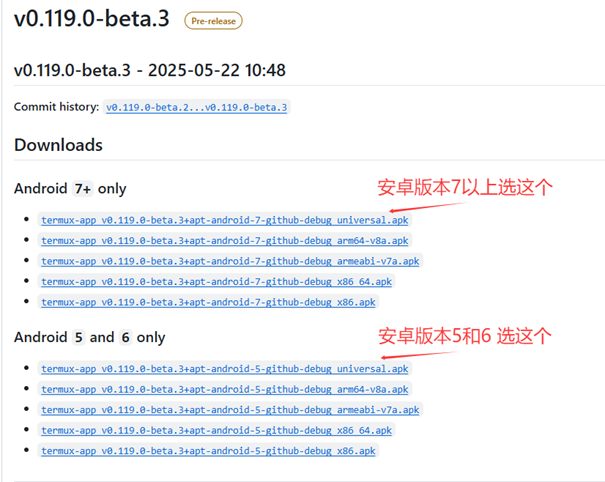
安装 Termux
Install Termux
从 F-Droid 或 GitHub 下载并安装 Termux。 Download and install Termux from F-Droid or GitHub.
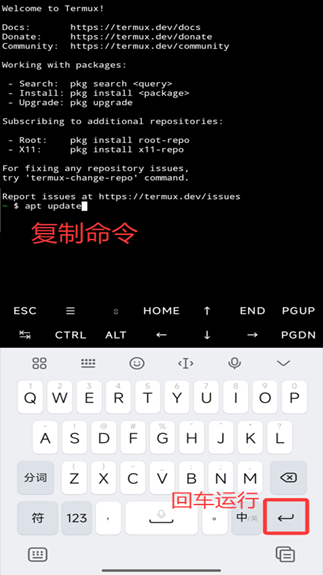
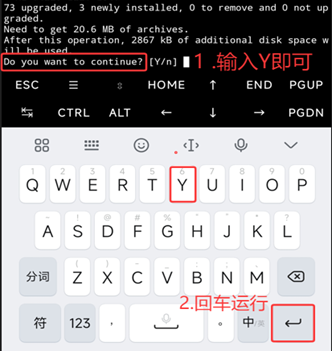
更新软件包
Update Packages
在 Termux 中更新软件包: Update packages in Termux:
pkg update && pkg upgrade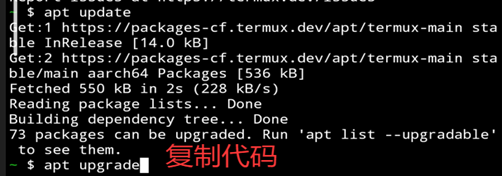
安装 Git
Install Git
pkg install git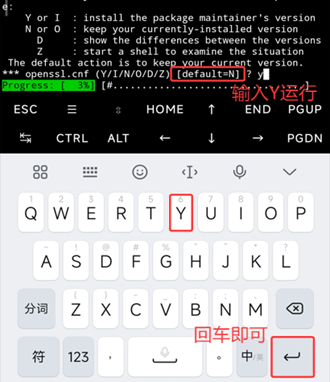
克隆酒馆仓库
Clone SillyTavern
git clone https://github.com/SillyTavern/SillyTavern -b release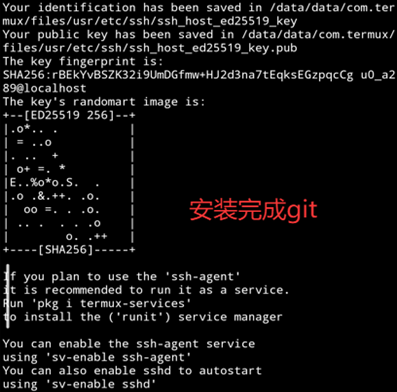
进入目录并安装 Node.js
Enter Directory and Install Node.js
进入 SillyTavern 目录并安装 Node.js: Enter SillyTavern directory and install Node.js:
cd SillyTavernpkg install nodejs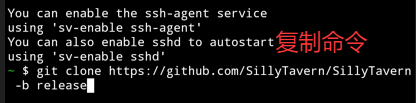

安装依赖
Install Dependencies
npm install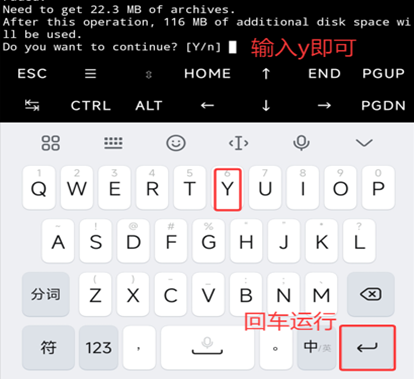
运行酒馆
Run SillyTavern
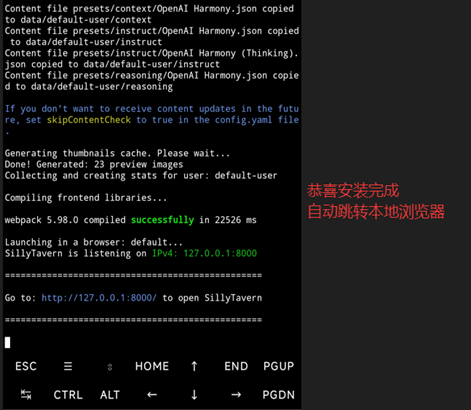
如果已在 SillyTavern 文件夹下,直接运行启动脚本: If already in SillyTavern folder, run the start script:
cd SillyTavern
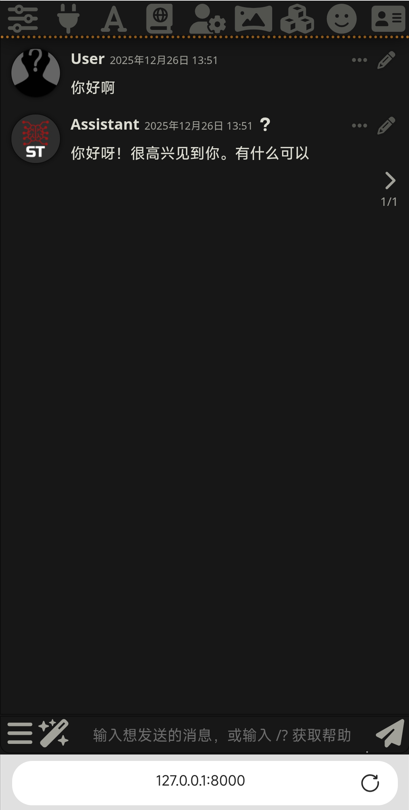
./start.sh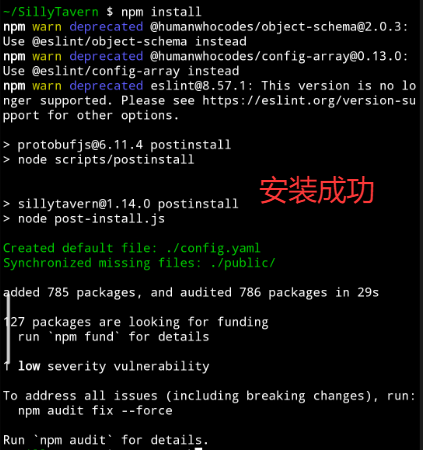
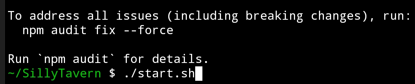
http://127.0.0.1:8000
If redirect fails, open in browser: http://127.0.0.1:8000
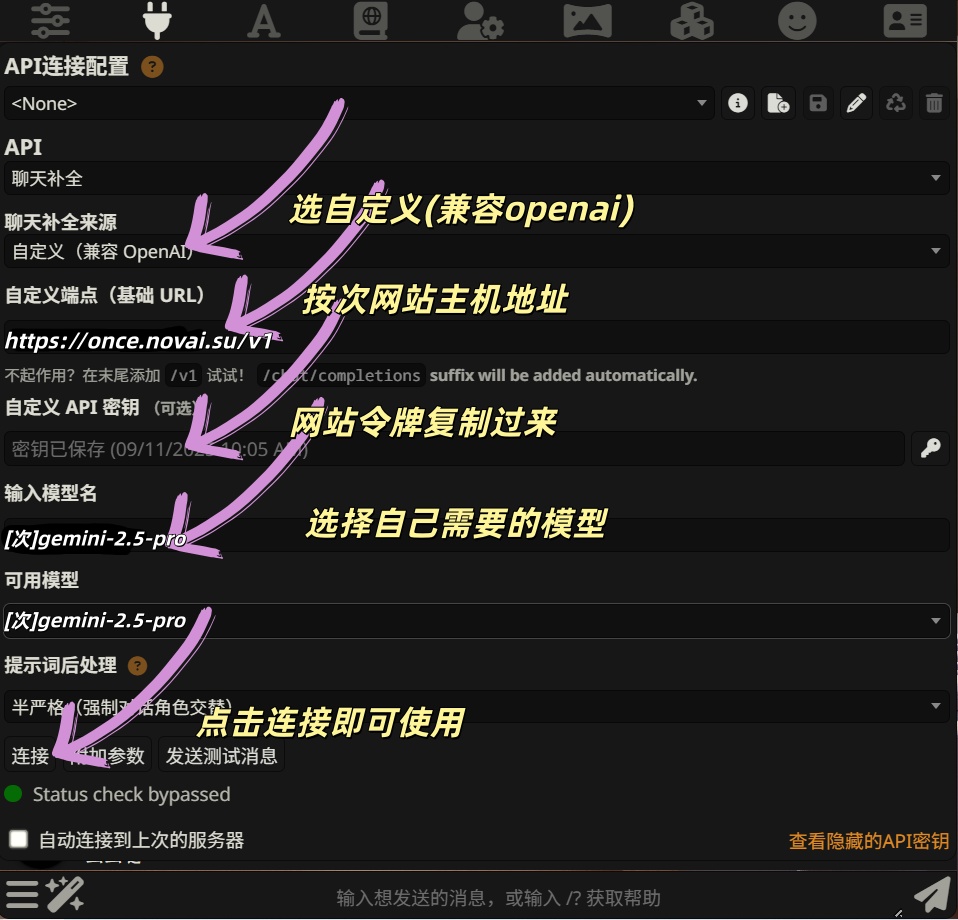
配置 API
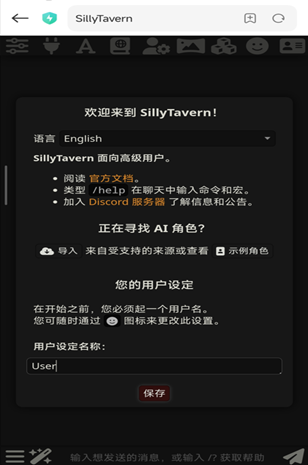
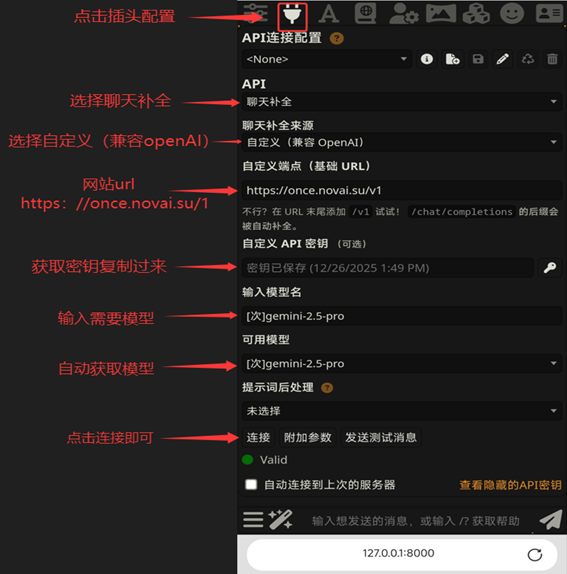
Configure API
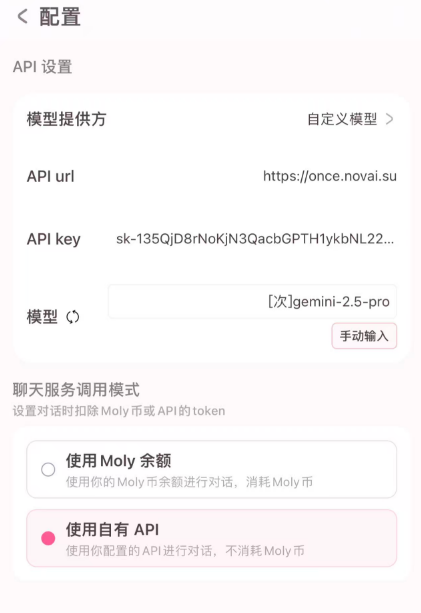
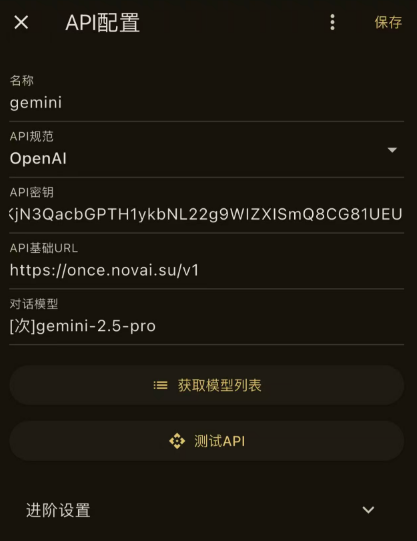
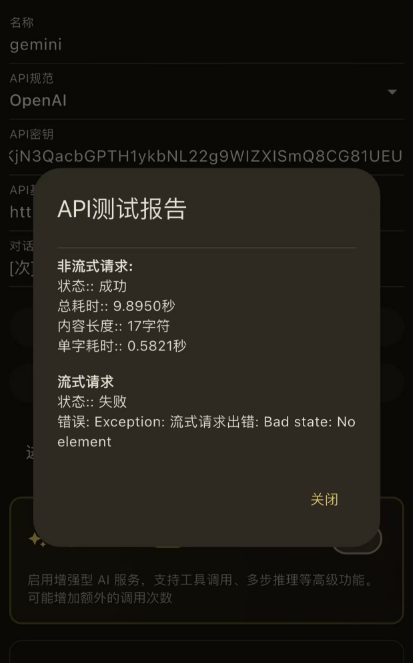
在 SillyTavern 中配置 Frog API: Configure Frog API in SillyTavern:
- 点击设置,聊天补全来源选择 自定义(兼容 OpenAI 协议)
- 自定义端点 URL:
https://www.frog-api.com/v1 - API 密钥: 填入您的令牌
- 模型名称:
[次]gemini-2.5-pro - 点击"获取可用模型"验证配置
Lovemo
Website lovemo.app(单击跳转!)API 来源: Custom (OpenAI Compatible)
Omate
Website omate.org(单击跳转!)API 来源: Custom (OpenAI Compatible)
Rikkahub
Website rikka-ai.com(单击跳转!)API 来源: Custom (OpenAI Compatible)

Tavo
Website tavoai.dev(单击跳转!)API 来源: Custom (OpenAI Compatible)

LifeKline
Website lifekline(单击跳转!)注意:此应用使用 gemini-3-pro-preview 模型。


提示词优化器配置教程
Prompt Optimizer Configuration
Website https://prompt.always200.com/(单击跳转!)配置步骤
Configuration Steps
1. 点击网页右上角的模型管理
1. Click Model Management in Top Right
打开提示词优化器网站后,点击页面右上角的"模型管理"按钮。 After opening the Prompt Optimizer website, click the "Model Management" button in the top right corner.

2. 配置 API 信息
2. Configure API Information
在模型管理页面中,按照以下信息进行配置: In the Model Management page, configure with the following information:
- 提供商:选择
openaiProvider: Selectopenai - API 密钥:填入您从 Frog API 网站获取的令牌 API Key: Enter your token from Frog API
- API 地址:
https://www.frog-api.com/v1API URL:https://www.frog-api.com/v1

3. 选择模型
3. Select Model
在模型选择中,选择 [次]gemini-2.5-pro 模型。
In model selection, choose [次]gemini-2.5-pro model.
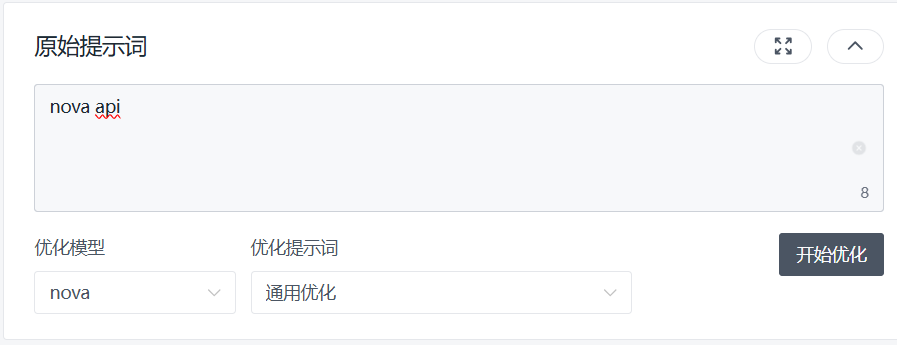
4. 开始使用
4. Start Using
配置完成后,选择刚才配置的模型进行对话即可。提示词优化器将帮助你优化和改进你的 AI 提示词。 After configuration, select the configured model to start chatting. The Prompt Optimizer will help you optimize and improve your AI prompts.
小懿 (XiaoYi)
Website xiaoyi.ink(单击跳转!)API 来源: Custom (OpenAI Compatible)

小手机 (SmallPhone)
API 来源: Custom (OpenAI Compatible)